Trustless Swap
This guide is rated as advanced.
You can expect advanced guides to take 2 hours or more of dedicated time. The length of time necessary to fully understand some of the concepts raised in this guide might increase this estimate.
이 가이드는 Sui에서 atomic swap을 수행하는 앱을 만드는 방법을 보여준다. Atomic swap은 신뢰할 수 있는 third party를 요구하지 않는다는 점에서 escrow와 비슷하다.
이 가이드에는 세 개의 주요 섹션이 있다:
- Smart Contracts: 상태를 보관하고 swap을 수행하는 Move 코드이다.
- Backend: 거래를 발견하기 위해 chain state를 index하는 서비스와, 이 데이터를 읽기 위한 API 서비스이다.
- Frontend: 사용자가 판매할 object를 등록하고 거래를 수락할 수 있게 하는 UI이다.
- Prerequisites
-
Set up your Sui account and CLI environment.
Create Sui account and setup CLI environment
$ sui client
If this is the first time running the sui client CLI tool, it asks you to provide a Sui full node server URL and a meaningful environment alias. It also generates an address with a random key pair in sui.keystore and a config client.yaml.
By default, the client.yaml and sui.keystore files are located in ~/.sui/sui_config. For more information, refer to the Sui client CLI tutorial.
If this is not your first time running sui client, then you already have a client.yaml file in your local environment. If you'd like to create a new address for this tutorial, use the command:
$ sui client new-address ed25519
- Obtain test tokens.
How to obtain tokens
If you are connected to Devnet or Testnet networks, use the Faucet UI to request tokens.
If you are connected to a local full node, learn how to get local network tokens.
You can view the complete source code for this app example in the Sui repository.
What the guide teaches
- Shared objects: 이 가이드는 shared objects를 사용하는 방법을 설명하며, 이 경우에는 거래하려는 두 Sui 사용자 사이의 escrow 역할을 하도록 사용한다. Shared objects는 Sui만의 고유한 개념이다. 어떤 transaction과 어떤 signer든지, 변경 사항이 해당 타입을 정의한 package가 정한 요구 사항을 충족하기만 하면 그것을 수정할 수 있다.
- Composability: 이 가이드는 완전한 composability를 가능하게 하는 방식으로 Move 코드를 설계하는 방법을 설명한다. 이 앱에서는 거래를 처리하는 Move 코드가 거래 대상 object를 정의하는 코드에 대해 완전히 알지 못하며, 그 반대도 마찬가지이다.
이 가이드는 또한 다음을 수행하는 앱을 구축하는 방법도 보여준다:
- Is trustless: 사용자는 어떤 third party도 신뢰하거나 비용을 지불할 필요가 없으며, chain이 swap을 관리한다.
- Avoids rug-pulls: 사용자가 거래를 시작한 뒤 거래 대상으로 원하는 object가 tamper되지 않았음을 보장한다.
- Preserves liveness: 다른 당사자가 ��응답을 멈추더라도 사용자는 언제든 거래에서 빠져나와 자신의 object를 되찾을 수 있다.
Directory structure
먼저 시스템에 trading이라는 새 folder를 만들고 여기에 모든 파일을 넣는다.
그 folder 안에 api, contracts, frontend라는 세 folder를 더 만든다.
이 예시의 일부 helper script는 이 디렉터리 이름을 대상으로 하므로 이 디렉터리 구조를 유지한다.
프로젝트마다 각자의 디렉터리 구조가 있지만, 유지보수를 돕기 위해 코드를 기능별 그룹으로 나누는 것은 흔한 방식이다.
- 최신 version의 Sui가 설치되어 있다. terminal 또는 console에서
sui --version을 실행하면 현재 설치된 version이 응답되어야 한다. - 활성 환경이 예상한 network를 가리키고 있다. 이를 확인하려면
sui client active-env를 실행한다. client와 server API version 불일치 경고를 받으면 Sui repo의 관련 branch(mainnet,testnet,devnet)에 있는 version으로 Sui를 업데이트한다. - 활성 address에 SUI가 있다. terminal 또는 console에서
sui client balance를 실행한다. 잔액이 없으면 faucet에서 acquire SUI한다(Mainnet에서는 사용할 수 없다). - 생성하는 파일을 둘 디렉터리가 있다. 가이드 후반부에서 제공하는 helper 함수를 사용한다면 제안된 디렉터리 이름이 중요하다.
Smart contracts
이 가이드의 이 부분에서는 trustless swap을 수행하는 Move contract를 작성한다. 가이드는 package를 처음부터 만드는 방법을 설명하지만, 따라 하기 위해 Sui repo에 있는 예시 코드의 fork나 복사본을 사용해도 된다. package 구조와 Sui CLI를 사용해 새 프로젝트를 scaffold하는 방법을 더 알아보려면 Hello, World!를 참조한다.
Move.toml
smart contract 작성을 시작하려면 contracts folder 안에 escrow folder를 만든다(권장 디렉터리 이름을 사용하는 경우).
그 folder 안에 Move.toml이라는 파일을 만들고 다음 코드를 복사해 넣는다.
이 파일은 package manifest file이다.
파일 구조를 더 알아보려면 The Move Book의 Package Manifest를 참조한다.
Testnet이 아닌 다른 network를 대상으로 한다면 Sui dependency의 rev 값을 반드시 업데이트한다.
[package]
name = "escrow"
version = "0.0.1"
edition = "2024.beta"

[dependencies]
[addresses]
escrow = "0x0"
Locked and Key
manifest file을 준비했으므로 이제 이 프로젝트의 Move asset을 만들기 시작한다.
escrow folder에서 Move.toml 파일과 같은 수준에 sources folder를 만든다.
이것이 Move package의 일반적인 파일 구조이다.
sources 안에 lock.move라는 새 파일을 만든다.
이 파일은 거래에 포함되는 object를 잠그는 로직을 담고 있다.
이 파일의 전체 source code는 다음과 같으며, 뒤이어 나오는 섹션들이 각 구성 요소를 자세히 설명한다.
codeblock 상단의 제목을 클릭하면 GitHub에서 해당 source file을 열 수 있다.
lock.move
lock.move/// The `lock` module offers an API for wrapping any object that has
/// `store` and protecting it with a single-use `Key`.
///
/// This is used to commit to swapping a particular object in a
/// particular, fixed state during escrow.
module escrow::lock;
use sui::dynamic_object_field as dof;
use sui::event;
/// The `name` of the DOF that holds the Locked object.
/// Allows better discoverability for the locked object.
public struct LockedObjectKey has copy, drop, store {}
/// A wrapper that protects access to `obj` by requiring access to a `Key`.
///
/// Used to ensure an object is not modified if it might be involved in a
/// swap.
///
/// Object is added as a Dynamic Object Field so that it can still be looked-up.
public struct Locked<phantom T: key + store> has key, store {
id: UID,
key: ID,
}
/// Key to open a locked object (consuming the `Key`)
public struct Key has key, store { id: UID }
// === Error codes ===
/// The key does not match this lock.
const ELockKeyMismatch: u64 = 0;
// === Public Functions ===
/// Lock `obj` and get a key that can be used to unlock it.
public fun lock<T: key + store>(obj: T, ctx: &mut TxContext): (Locked<T>, Key) {
let key = Key { id: object::new(ctx) };
let mut lock = Locked {
id: object::new(ctx),
key: object::id(&key),
};
event::emit(LockCreated {
lock_id: object::id(&lock),
key_id: object::id(&key),
creator: ctx.sender(),
item_id: object::id(&obj),
});
// Adds the `object` as a DOF for the `lock` object
dof::add(&mut lock.id, LockedObjectKey {}, obj);
(lock, key)
}
/// Unlock the object in `locked`, consuming the `key`. Fails if the wrong
/// `key` is passed in for the locked object.
public fun unlock<T: key + store>(mut locked: Locked<T>, key: Key): T {
assert!(locked.key == object::id(&key), ELockKeyMismatch);
let Key { id } = key;
id.delete();
let obj = dof::remove<LockedObjectKey, T>(&mut locked.id, LockedObjectKey {});
event::emit(LockDestroyed { lock_id: object::id(&locked) });
let Locked { id, key: _ } = locked;
id.delete();
obj
}
// === Events ===
public struct LockCreated has copy, drop {
/// The ID of the `Locked` object.
lock_id: ID,
/// The ID of the key that unlocks a locked object in a `Locked`.
key_id: ID,
/// The creator of the locked object.
creator: address,
/// The ID of the item that is locked.
item_id: ID,
}
public struct LockDestroyed has copy, drop {
/// The ID of the `Locked` object.
lock_id: ID,
}
// === Tests ===
#[test_only]
use sui::coin::{Self, Coin};
#[test_only]
use sui::sui::SUI;
#[test_only]
use sui::test_scenario::{Self as ts, Scenario};
#[test_only]
fun test_coin(ts: &mut Scenario): Coin<SUI> {
coin::mint_for_testing<SUI>(42, ts.ctx())
}
#[test]
fun test_lock_unlock() {
let mut ts = ts::begin(@0xA);
let coin = test_coin(&mut ts);
let (lock, key) = lock(coin, ts.ctx());
let coin = lock.unlock(key);
coin.burn_for_testing();
ts.end();
}
#[test]
#[expected_failure(abort_code = ELockKeyMismatch)]
fun test_lock_key_mismatch() {
let mut ts = ts::begin(@0xA);
let coin = test_coin(&mut ts);
let another_coin = test_coin(&mut ts);
let (l, _k) = lock(coin, ts.ctx());
let (_l, k) = lock(another_coin, ts.ctx());
let _key = l.unlock(k);
abort 1337
}
거래가 시작된 뒤에는 거래 당사자가 자신이 거래하기로 한 object를 수정하지 못하게 해야 한다. 예를 들어 게임 내 아이템을 거래한다고 가정할 때, 모든 attachment가 달린 무기를 거래하기로 합의했는데 소유자가 거래 직전에 attachment를 모두 떼어낼 수 있다.
전통적인 거래에서는 보통 third party가 아이템을 escrow로 보관하여 거래가 끝나기 전에 tamper되지 않았는지 확인한다. 이는 그 third party가 스스로 tamper하지 않을 것이라고 신뢰하거나, 그런 일이 일어나지 않도록 비용을 지불하거나, 둘 다 해야 함을 뜻한다.
그러나 trustless swap에서는 Move의 safety 속성을 이용해, 다른 누구도 개입시키지 않고 object 소유자가 거래하기로 한 object version을 tamper하지 않았음을 증명하도록 강제할 수 있다.
이를 위해 거래 가능한 object가 single-use key로 locked되어 있어야 하도록 요구하고, 거래를 마무리할 때 소유자가 그 key를 제공하도록 한다.
object를 tamper하려면 그것을 unlock해야 하고, 그러면 key가 소비된다. 그 결과 거래를 끝낼 key가 더 이상 남지 않게 된다.
public struct Locked<phantom T: key + store> has key, store {
    id: UID,
    key: ID,
}

public struct Key has key, store { id: UID }
Locked<T>타입은 그것을 unlock하는 key의ID와 자신의id를 저장한다. 잠기는 object는 dynamic object field로 추가되어, 오프체인에서 여전히 원래 ID로 읽을 수 있다.- 대응하는
Key타입은 자신의id만 저장한다.
lock과 key는 lock 및 unlock 함수의 signature를 통해 single-use가 된다.
lock은 T: store 타입의 어떤 object든 받으며(store ability는 이를 Locked<T> 안에 저장하기 위해 필요하다), Locked<T>와 이에 대응하는 Key를 모두 만든다:
lock.move의 lock 함수
lock.move의 lock 함수public fun lock<T: key + store>(obj: T, ctx: &mut TxContext): (Locked<T>, Key) {
let key = Key { id: object::new(ctx) };
let mut lock = Locked {
id: object::new(ctx),
key: object::id(&key),
};
event::emit(LockCreated {
lock_id: object::id(&lock),
key_id: object::id(&key),
creator: ctx.sender(),
item_id: object::id(&obj),
});
dof::add(&mut lock.id, LockedObjectKey {}, obj);
(lock, key)
}
unlock 함수는 Locked<T>와 Key를 값으로 받아(즉 둘 다 소비하며), lock에 맞는 올바른 key가 제공된 경우 내부의 T를 반환한다:
lock.move의 unlock 함수
lock.move의 unlock 함수const ELockKeyMismatch: u64 = 0;
public fun unlock<T: key + store>(mut locked: Locked<T>, key: Key): T {
    assert!(locked.key == object::id(&key), ELockKeyMismatch);
    let Key { id } = key;
    id.delete();

    let obj = dof::remove<LockedObjectKey, T>(&mut locked.id, LockedObjectKey {});

    event::emit(LockDestroyed { lock_id: object::id(&locked) });

    let Locked { id, key: _ } = locked;
    id.delete();
    obj
}
이 둘은 lock 작업 전에 해당 lock과 key가 존재할 수 없고, unlock이 성공한 뒤에도 더 이상 존재하지 않음을 함께 보장한다. 즉 single use이다.
- The Move Book에 정의된 Move Package
- Concepts: 래핑된 객체
Testing Locked and Key
Move의 타입 시스템은 주어진 Key를 재사용할 수 없음을 보장한다(unlock이 이를 값으로 받기 때문이지만), 일부 속성은 test로 확인할 필요가 있다:
- 잠긴 object는 그 key로 unlock할 수 있어야 한다.
- 잘못된 key로 object를 unlock하려고 하면 실패해야 한다.
test는 object를 만드는 helper 함수로 시작한다.
object 타입은 store ability만 있으면 무엇이든 상관없다.
test는 mint를 위한 #[test_only] 함수를 제공하므로 Coin<SUI>를 사용한다:
#[test_only]
fun test_coin(ts: &mut Scenario): Coin<SUI> {
    coin::mint_for_testing<SUI>(42, ts.ctx())
}
- 모든 test 관련 함수와 import는 게시된 package에 나타나지 않도록
#[test_only]로 annotation된다. test를 별도 module(예:lock_tests.move)로 분리하고 그 module을#[test_only]로 표시하는 방식으로도 할 수 있다. test_scenariomodule은 test에서&mut TxContext에 접근할 수 있도록 사용된다(새 object를 만드는 데 필요하다). 여러 transaction을 시뮬레이션할 필요는 없지만TxContext접근이 필요한 test는 대신sui::tx_context::dummy를 사용해 test context를 만들 수 있다.
첫 번째 test는 test용 object를 만들고, 그것을 lock한 뒤 unlock하는 방식으로 동작하며, abort 없이 실행이 끝나야 한다.
마지막 두 줄은 test coin과 test scenario object를 정리해 Move compiler가 문제 삼지 않도록 하기 위해 존재하는데, Move의 값은 drop ability가 없으면 자동으로 정리되지 않기 때문이다.
#[test]
fun test_lock_unlock() {
    let mut ts = ts::begin(@0xA);
    let coin = test_coin(&mut ts);

    let (lock, key) = lock(coin, ts.ctx());
    let coin = lock.unlock(key);

    coin.burn_for_testing();
    ts.end();
}
다른 test는 abort가 발생해야 하는 실패 시나리오를 검증한다.
이 test는 두 개의 locked object를 만들고(이번에는 값이 단순 u64이다), 한쪽의 key로 다른 쪽을 unlock하려고 시도하며, 이 시도는 실패해야 한다(expected_failure attribute로 지정).
이전 test와 달리 같은 정리 작업은 필요하지 않는데, 코드가 종료될 것으로 예상되기 때문이다. 그 대신 abort가 일어나기를 기대하는 코드 뒤에 또 다른 abort를 추가한다(이 두 번째 abort에는 다른 코드를 사용해야 한다).
#[test]
#[expected_failure(abort_code = ELockKeyMismatch)]
fun test_lock_key_mismatch() {
    let mut ts = ts::begin(@0xA);
    let coin = test_coin(&mut ts);
    let another_coin = test_coin(&mut ts);
    let (l, _k) = lock(coin, ts.ctx());
    let (_l, k) = lock(another_coin, ts.ctx());

    let _key = l.unlock(k);
    abort 1337
}
- Concepts: Test Scenario
- The Move Book에 정의된 Drop ability
- The Move Book의 [Testing] Move code discussion
이 시점에서 다음을 갖추었다:
- manifest file(
Move.toml)로 구성된 Move package sourcesfolder 안의lock.move파일
escrow folder에서 terminal 또는 console에 sui move test를 실행한다.
성공하면 다음과 비슷한 응답을 받아 package가 build되고 test가 통과했음을 확인할 수 있다:
INCLUDING DEPENDENCY Sui
INCLUDING DEPENDENCY MoveStdlib
BUILDING escrow
Running Move unit tests
[ PASS    ] escrow::lock::test_lock_key_mismatch
[ PASS    ] escrow::lock::test_lock_unlock
Test result: OK. Total tests: 2; passed: 2; failed: 0
Move compiler는 build가 성공하면 escrow 안에 build subfolder를 만든다는 점을 알 수 있다.
이 folder에는 package의 compile된 bytecode, package dependency의 코드, 그리고 build에 필요한 다양한 다른 파일이 들어 있다.
이 시점에서는 이 파일들이 있다는 점만 알고 있으면 된다.
build의 내용까지 완전히 이해할 필요는 없다.
The Escrow protocol
escrow folder 안에 shared.move라는 새 파일을 만든다.
이 파일의 코드는 shared Escrow object를 만들고 거래 로직을 완성한다.
이 파일의 전체 source code는 다음과 같으며, 뒤이어 나오는 섹션들이 각 구성 요소를 자세히 설명한다.
shared.move
shared.movemodule escrow::shared;
use escrow::lock::{Locked, Key};
use sui::dynamic_object_field as dof;
use sui::event;
public struct EscrowedObjectKey has copy, drop, store {}
public struct Escrow<phantom T: key + store> has key, store {
    id: UID,
    sender: address,
    recipient: address,
    exchange_key: ID,
}
const EMismatchedSenderRecipient: u64 = 0;
const EMismatchedExchangeObject: u64 = 1;
public fun create<T: key + store>(
escrowed: T,
exchange_key: ID,
recipient: address,
ctx: &mut TxContext,
) {
let mut escrow = Escrow<T> {
id: object::new(ctx),
sender: ctx.sender(),
recipient,
exchange_key,
};
event::emit(EscrowCreated {
escrow_id: object::id(&escrow),
key_id: exchange_key,
sender: escrow.sender,
recipient,
item_id: object::id(&escrowed),
});
dof::add(&mut escrow.id, EscrowedObjectKey {}, escrowed);
transfer::public_share_object(escrow);
}
public fun swap<T: key + store, U: key + store>(
mut escrow: Escrow<T>,
key: Key,
locked: Locked<U>,
ctx: &TxContext,
): T {
let escrowed = dof::remove<EscrowedObjectKey, T>(&mut escrow.id, EscrowedObjectKey {});
let Escrow {
id,
sender,
recipient,
exchange_key,
} = escrow;
assert!(recipient == ctx.sender(), EMismatchedSenderRecipient);
assert!(exchange_key == object::id(&key), EMismatchedExchangeObject);
transfer::public_transfer(locked.unlock(key), sender);
event::emit(EscrowSwapped {
escrow_id: id.to_inner(),
});
id.delete();
escrowed
}
public fun return_to_sender<T: key + store>(mut escrow: Escrow<T>, ctx: &TxContext): T {
    event::emit(EscrowCancelled {
        escrow_id: object::id(&escrow),
    });

    let escrowed = dof::remove<EscrowedObjectKey, T>(&mut escrow.id, EscrowedObjectKey {});

    let Escrow {
        id,
        sender,
        recipient: _,
        exchange_key: _,
    } = escrow;

    assert!(sender == ctx.sender(), EMismatchedSenderRecipient);
    id.delete();
    escrowed
}
public struct EscrowCreated has copy, drop {
escrow_id: ID,
key_id: ID,
sender: address,
recipient: address,
item_id: ID,
}
public struct EscrowSwapped has copy, drop {
escrow_id: ID,
}
public struct EscrowCancelled has copy, drop {
escrow_id: ID,
}
#[test_only]
use sui::coin::{Self, Coin};
#[test_only]
use sui::sui::SUI;
#[test_only]
use sui::test_scenario::{Self as ts, Scenario};
#[test_only]
use escrow::lock;
#[test_only]
const ALICE: address = @0xA;
#[test_only]
const BOB: address = @0xB;
#[test_only]
const DIANE: address = @0xD;
#[test_only]
fun test_coin(ts: &mut Scenario): Coin<SUI> {
coin::mint_for_testing<SUI>(42, ts.ctx())
}
#[test]
fun test_successful_swap() {
let mut ts = ts::begin(@0x0);
let (i2, ik2) = {
ts.next_tx(BOB);
let c = test_coin(&mut ts);
let cid = object::id(&c);
let (l, k) = lock::lock(c, ts.ctx());
let kid = object::id(&k);
transfer::public_transfer(l, BOB);
transfer::public_transfer(k, BOB);
(cid, kid)
};
let i1 = {
ts.next_tx(ALICE);
let c = test_coin(&mut ts);
let cid = object::id(&c);
create(c, ik2, BOB, ts.ctx());
cid
};
{
ts.next_tx(BOB);
let escrow: Escrow<Coin<SUI>> = ts.take_shared();
let k2: Key = ts.take_from_sender();
let l2: Locked<Coin<SUI>> = ts.take_from_sender();
let c = escrow.swap(k2, l2, ts.ctx());
transfer::public_transfer(c, BOB);
};
ts.next_tx(@0x0);
{
let c: Coin<SUI> = ts.take_from_address_by_id(ALICE, i2);
ts::return_to_address(ALICE, c);
};
{
let c: Coin<SUI> = ts.take_from_address_by_id(BOB, i1);
ts::return_to_address(BOB, c);
};
ts::end(ts);
}
#[test]
#[expected_failure(abort_code = EMismatchedSenderRecipient)]
fun test_mismatch_sender() {
let mut ts = ts::begin(@0x0);
let ik2 = {
ts.next_tx(DIANE);
let c = test_coin(&mut ts);
let (l, k) = lock::lock(c, ts.ctx());
let kid = object::id(&k);
transfer::public_transfer(l, DIANE);
transfer::public_transfer(k, DIANE);
kid
};
{
ts.next_tx(ALICE);
let c = test_coin(&mut ts);
create(c, ik2, BOB, ts.ctx());
};
{
ts.next_tx(DIANE);
let escrow: Escrow<Coin<SUI>> = ts.take_shared();
let k2: Key = ts.take_from_sender();
let l2: Locked<Coin<SUI>> = ts.take_from_sender();
let c = escrow.swap(k2, l2, ts.ctx());
transfer::public_transfer(c, DIANE);
};
abort 1337
}
#[test]
#[expected_failure(abort_code = EMismatchedExchangeObject)]
fun test_mismatch_object() {
let mut ts = ts::begin(@0x0);
{
ts.next_tx(BOB);
let c = test_coin(&mut ts);
let (l, k) = lock::lock(c, ts.ctx());
transfer::public_transfer(l, BOB);
transfer::public_transfer(k, BOB);
};
{
ts.next_tx(ALICE);
let c = test_coin(&mut ts);
let cid = object::id(&c);
create(c, cid, BOB, ts.ctx());
};
{
ts.next_tx(BOB);
let escrow: Escrow<Coin<SUI>> = ts.take_shared();
let k2: Key = ts.take_from_sender();
let l2: Locked<Coin<SUI>> = ts.take_from_sender();
let c = escrow.swap(k2, l2, ts.ctx());
transfer::public_transfer(c, BOB);
};
abort 1337
}
#[test]
#[expected_failure(abort_code = EMismatchedExchangeObject)]
fun test_object_tamper() {
let mut ts = ts::begin(@0x0);
let ik2 = {
ts.next_tx(BOB);
let c = test_coin(&mut ts);
let (l, k) = lock::lock(c, ts.ctx());
let kid = object::id(&k);
transfer::public_transfer(l, BOB);
transfer::public_transfer(k, BOB);
kid
};
{
ts.next_tx(ALICE);
let c = test_coin(&mut ts);
create(c, ik2, BOB, ts.ctx());
};
{
ts.next_tx(BOB);
let k: Key = ts.take_from_sender();
let l: Locked<Coin<SUI>> = ts.take_from_sender();
let mut c = lock::unlock(l, k);
let _dust = c.split(1, ts.ctx());
let (l, k) = lock::lock(c, ts.ctx());
let escrow: Escrow<Coin<SUI>> = ts.take_shared();
let c = escrow.swap(k, l, ts.ctx());
transfer::public_transfer(c, BOB);
};
abort 1337
}
#[test]
fun test_return_to_sender() {
let mut ts = ts::begin(@0x0);
let cid = {
ts.next_tx(ALICE);
let c = test_coin(&mut ts);
let cid = object::id(&c);
let i = object::id_from_address(@0x0);
create(c, i, BOB, ts.ctx());
cid
};
{
ts.next_tx(ALICE);
let escrow: Escrow<Coin<SUI>> = ts.take_shared();
let c = escrow.return_to_sender(ts.ctx());
transfer::public_transfer(c, ALICE);
};
ts.next_tx(@0x0);
{
let c: Coin<SUI> = ts.take_from_address_by_id(ALICE, cid);
ts::return_to_address(ALICE, c)
};
ts::end(ts);
}
#[test]
#[expected_failure]
fun test_return_to_sender_failed_swap() {
let mut ts = ts::begin(@0x0);
let ik2 = {
ts.next_tx(BOB);
let c = test_coin(&mut ts);
let (l, k) = lock::lock(c, ts.ctx());
let kid = object::id(&k);
transfer::public_transfer(l, BOB);
transfer::public_transfer(k, BOB);
kid
};
{
ts.next_tx(ALICE);
let c = test_coin(&mut ts);
create(c, ik2, BOB, ts.ctx());
};
{
ts.next_tx(ALICE);
let escrow: Escrow<Coin<SUI>> = ts.take_shared();
let c = escrow.return_to_sender(ts.ctx());
transfer::public_transfer(c, ALICE);
};
{
ts.next_tx(BOB);
let escrow: Escrow<Coin<SUI>> = ts.take_shared();
let k2: Key = ts.take_from_sender();
let l2: Locked<Coin<SUI>> = ts.take_from_sender();
let c = escrow.swap(k2, l2, ts.ctx());
transfer::public_transfer(c, BOB);
};
abort 1337
}
거래는 세 단계로 진행된다:
- 첫 번째 당사자가 자신이 거래하려는 object를 lock한다. 이는 앞서 작성한
lockmodule이 이미 처리한다. - 두 번째 당사자는 자신의 object를 escrow에 올리고 첫 번째 당사자의 object에 대한 관심을 등록한다. 이는
escrow라는 새 module이 처리한다. - 첫 번째 당사자는 자신의 locked object와 그것을 unlock할 key를 제공해 거래를 완료한다. 모든 검사가 통과하면 자신의 object는 두 번째 당사자에게 전송되고, 두 번째 당사자의 object는 자신이 받을 수 있게 된다.
두 번째와 세 번째 단계를 구현하는 것부터 시작할 수 있으며, 이를 위해 escrow된 object를 보관할 새 타입을 정의한다.
이 타입은 escrowed object와 id: UID를 보관하고(그 자체로도 object이기 때문), 거래가 일어날 때 일치하는지 확인하기 위해 sender와 의도된 recipient도 기록하며, object를 담고 있는 Locked<U>를 unlock하는 key의 ID를 기록해 첫 번째 당사자의 object에 대한 관심을 등록한다.
public struct Escrow<phantom T: key + store> has key, store {
id: UID,
sender: address,
recipient: address,
exchange_key: ID,
}
또한 Escrow object를 만드는 함수도 만들어야 한다.
이 object는 이를 만든 address가(해당 object를 반환해야 할 경우를 대비해) 접근할 수 있어야 하고, 의도된 recipient도 swap을 완료하기 위해 접근해야 하므로 shared object이다.
shared.move의 create 함수
shared.move의 create 함수public fun create<T: key + store>(
escrowed: T,
exchange_key: ID,
recipient: address,
ctx: &mut TxContext,
) {
let mut escrow = Escrow<T> {
id: object::new(ctx),
sender: ctx.sender(),
recipient,
exchange_key,
};
dof::add(&mut escrow.id, EscrowedObjectKey {}, escrowed);
transfer::public_share_object(escrow);
}
두 번째 당사자가 응답을 멈추면 첫 번째 당사자는 자신의 object를 unlock할 수 있다. 대칭적인 경우에 두 번째 당사자도 자신의 object를 회수할 수 있도록 하는 함수를 만들어야 한다.
Escrowobject는 shared object라 누구나 접근할 수 있으므로 caller가sender와 일치하는지 확인해야 한다.- escrow된 object를 꺼낸 뒤 정리할 수 있도록
Escrow를 값으로 받으며, 이를 통해 sender의 스토리지 리베이트(storage rebate)를 회수하고 chain에 남는 사용되지 않는 object를 정리할 수 있다.
shared.move의 return_to_sender 함수
shared.move의 return_to_sender 함수public fun return_to_sender<T: key + store>(mut escrow: Escrow<T>, ctx: &TxContext): T {
event::emit(EscrowCancelled {
escrow_id: object::id(&escrow),
});
let escrowed = dof::remove<EscrowedObjectKey, T>(&mut escrow.id, EscrowedObjectKey {});
let Escrow {
id,
sender,
recipient: _,
exchange_key: _,
} = escrow;
assert!(sender == ctx.sender(), EMismatchedSenderRecipient);
id.delete();
escrowed
}
마지막으로 첫 번째 당사자가 거래를 완료할 수 있도록 하는 함수도 추�가해야 한다.
- 이 함수 또한 swap이 완료된 뒤
Escrow를 소비하므로 값을 받아들인다. - transaction sender가 의도된 recipient(첫 번째 당사자)인지, 그리고 그가 제공한 key의 ID가 object가 escrow될 때 지정된 key와 일치하는지를 확인한다. 이는 tampering이 일어나지 않았음을 보장하는데, 이 key는 object를 unlock하는 데 사용되지 않았을 때만 제공할 수 있고, 그것은
create호출과swap호출 사이에 object가Locked<U>를 벗어나지 않았음을 증명하기 때문이다.lockmodule을 살펴보면 সেখানে 있는 동안 object가 수정될 수 없음을 확인할 수 있다. unlock호출은 제공된 key가 전달된 locked object와 일치하는지도 추가로 확인한다.- escrow된 object를 recipient address로 전송하는 대신
swap함수가 반환한다. transaction sender가 recipient라는 점을 이미 확인했기 때문에 이렇게 할 수 있고, 이 방식이 API를 더 composable하게 만든다. Programmable transaction block(PTB)은 object를 받은 직후 전송할지 아니면 다른 작업을 할지를 결정하는 유연성을 제공한다.
shared.move의 swap 함수
shared.move의 swap 함수const EMismatchedSenderRecipient: u64 = 0;
const EMismatchedExchangeObject: u64 = 1;
public fun swap<T: key + store, U: key + store>(
    mut escrow: Escrow<T>,
    key: Key,
    locked: Locked<U>,
    ctx: &TxContext,
): T {
    let escrowed = dof::remove<EscrowedObjectKey, T>(&mut escrow.id, EscrowedObjectKey {});

    let Escrow {
        id,
        sender,
        recipient,
        exchange_key,
    } = escrow;

    assert!(recipient == ctx.sender(), EMismatchedSenderRecipient);
    assert!(exchange_key == object::id(&key), EMismatchedExchangeObject);

    transfer::public_transfer(locked.unlock(key), sender);

    event::emit(EscrowSwapped {
        escrow_id: id.to_inner(),
    });

    id.delete();

    escrowed
}
- Full source code
- Concepts: 공유 객체
- Concepts: Shared Object Deletion
- Concepts: PTBs
Testing
escrow module에 대한 test는 lock보다 더 복잡한데, 서로 다른 sender의 여러 transaction을 시뮬레이션하고 shared objects와 상호작용할 수 있는 test_scenario 기능을 활용하기 때문이다.
이 가이드는 성공적인 swap에 대한 test에 집중하지만, 나머지 모든 test도 뒤에서 링크로 확인할 수 있다.
lock test와 마��찬가지로 test coin을 mint하는 함수부터 만든다.
또한 transaction sender를 나타내는 상수 ALICE, BOB, DIANE도 만든다.
#[test_only]
fun test_coin(ts: &mut Scenario): Coin<SUI> {
    coin::mint_for_testing<SUI>(42, ts.ctx())
}
test 본문은 test_scenario::begin 호출로 시작해서 test_scenario::end 호출로 끝난다.
각 새 transaction의 시작에서 ALICE 또는 BOB 중 하나를 선택하므로 begin에 어떤 address를 넘기든 상관없고, 따라서 @0x0으로 설정한다:
#[test]
fun test_successful_swap() {
    let mut ts = ts::begin(@0x0);

    // Bob locks the object they want to trade.
    let (i2, ik2) = {
        ts.next_tx(BOB);
        let c = test_coin(&mut ts);
        let cid = object::id(&c);
        let (l, k) = lock::lock(c, ts.ctx());
        let kid = object::id(&k);
        transfer::public_transfer(l, BOB);
        transfer::public_transfer(k, BOB);
        (cid, kid)
    };

    // Alice creates a public Escrow holding the object they are willing to
    // share, and the object they want from Bob
    let i1 = {
        ts.next_tx(ALICE);
        let c = test_coin(&mut ts);
        let cid = object::id(&c);
        create(c, ik2, BOB, ts.ctx());
        cid
    };

    // Bob responds by offering their object, and gets Alice's object in
    // return.
    {
        ts.next_tx(BOB);
        let escrow: Escrow<Coin<SUI>> = ts.take_shared();
        let k2: Key = ts.take_from_sender();
        let l2: Locked<Coin<SUI>> = ts.take_from_sender();
        let c = escrow.swap(k2, l2, ts.ctx());

        transfer::public_transfer(c, BOB);
    };
    // Commit effects from the swap
    ts.next_tx(@0x0);

    // Alice gets the object from Bob
    {
        let c: Coin<SUI> = ts.take_from_address_by_id(ALICE, i2);
        ts::return_to_address(ALICE, c);
    };

    // Bob gets the object from Alice
    {
        let c: Coin<SUI> = ts.take_from_address_by_id(BOB, i1);
        ts::return_to_address(BOB, c);
    };

    ts::end(ts);
}
첫 번째 transaction은 BOB가 coin을 만들고 그것을 lock하는 것이다.
나중에 필요하므로 coin의 ID와 key의 ID를 기억해 두어야 한다.
그런 다음 locked object와 key 자체를 BOB에게 전송하는데, 이는 실제 transaction에서 일어날 일과 같다.
test에서 transaction을 시뮬레이션할 때는 chain에 transaction 사이로 기록되어야 하는 전체 object가 아니라 primitive value만 유지해야 한다.
이 transaction들을 test_successful_swap 함수 안의 begin과 end 호출 사이에 작성한다.
let (i2, ik2) = {
    ts.next_tx(BOB);
    let c = test_coin(&mut ts);
    let cid = object::id(&c);
    let (l, k) = lock::lock(c, ts.ctx());
    let kid = object::id(&k);
    transfer::public_transfer(l, BOB);
    transfer::public_transfer(k, BOB);
    (cid, kid)
};
다음으로 ALICE가 와서 Escrow를 설정하며, 이때 자신의 coin을 lock한다.
그들은 BOB의 key ID인 ik2를 참조하여 BOB의 coin에 대한 관심을 등록한다:
let i1 = {
    ts.next_tx(ALICE);
    let c = test_coin(&mut ts);
    let cid = object::id(&c);
    create(c, ik2, BOB, ts.ctx());
    cid
};
마지막으로 BOB가 swap을 호출해 거래를 완료한다.
take_shared 함수는 shared 입력을 받는 상황을 시뮬레이션하는 데 사용된다.
타입 추론을 사용해 이 object가 Escrow여야 함을 알아내고, 직전 transaction에서 ALICE가 공유한 이 타입의 마지막 object를 찾는다.
마찬가지로 소유 입력을 받는 상황을 시뮬레이션하기 위해 take_from_sender를 사용하며(이 경우 BOB의 lock과 key), swap이 반환한 coin은 PTB 일부로 호출된 것처럼 transfer 명령 뒤에 따라오는 방식으로 다시 BOB에게 전송된다.
{
    ts.next_tx(BOB);
    let escrow: Escrow<Coin<SUI>> = ts.take_shared();
    let k2: Key = ts.take_from_sender();
    let l2: Locked<Coin<SUI>> = ts.take_from_sender();
    let c = escrow.swap(k2, l2, ts.ctx());

    transfer::public_transfer(c, BOB);
};
나머지 test는 ALICE가 BOB의 coin을 가지며 그 반대도 성립하는지를 확인하도록 설계되어 있다.
필요한 확인을 수행하기 전에 이전 transaction의 effects가 commit되었는지 보장하기 위해 next_tx를 먼저 호출한다.
ts.next_tx(@0x0);

{
    let c: Coin<SUI> = ts.take_from_address_by_id(ALICE, i2);
    ts::return_to_address(ALICE, c);
};

{
    let c: Coin<SUI> = ts.take_from_address_by_id(BOB, i1);
    ts::return_to_address(BOB, c);
};
- Guides: Test Scenario
Observability
이제 escrow Move package는 기능적으로 동작한다.
이를 chain에 publish하고 transaction을 만들어 trustless swap을 수행할 수 있다.
이 transaction을 만들려면 Locked, Key, Escrow object의 ID를 알아야 한다.
Locked와 Key object는 보통 transaction sender가 소유하므로 Sui RPC를 통해 조회할 수 있지만, Escrow object는 shared object이므로 sender와 recipient 기준으로 조회할 수 있으면 유용하다(그래야 사용자가 자신이 제안한 거래와 받은 거래를 볼 수 있다).
sender나 recipient 기준으로 Escrow object를 조회하려면 custom indexing이 필요하며, indexer가 관련 transaction을 쉽게 식별할 수 있도록 escrow.move에 다음 events를 추가한다:
public struct EscrowCreated has copy, drop {
    escrow_id: ID,
    key_id: ID,
    sender: address,
    recipient: address,
    item_id: ID,
}
public struct EscrowSwapped has copy, drop {
    escrow_id: ID,
}
public struct EscrowCancelled has copy, drop {
    escrow_id: ID,
}
escrow 생명주기의 여러 부분을 담당하는 함수들이 이 이벤트를 발생시킨다. 그러면 커스텀 인덱서는 전체 chain state가 아니라 이 이벤트를 내보내는 transaction만 구독해 처리할 수 있다:
shared.move 함수에 포함된 emit 이벤트
shared.move 함수에 포함된 emit 이벤트use sui::event;
public fun create<T: key + store>(
    escrowed: T,
    exchange_key: ID,
    recipient: address,
    ctx: &mut TxContext,
) {
    let mut escrow = Escrow<T> {
        id: object::new(ctx),
        sender: ctx.sender(),
        recipient,
        exchange_key,
    };
    event::emit(EscrowCreated {
        escrow_id: object::id(&escrow),
        key_id: exchange_key,
        sender: escrow.sender,
        recipient,
        item_id: object::id(&escrowed),
    });

    dof::add(&mut escrow.id, EscrowedObjectKey {}, escrowed);

    transfer::public_share_object(escrow);
}

public fun swap<T: key + store, U: key + store>(
    mut escrow: Escrow<T>,
    key: Key,
    locked: Locked<U>,
    ctx: &TxContext,
): T {
    let escrowed = dof::remove<EscrowedObjectKey, T>(&mut escrow.id, EscrowedObjectKey {});

    let Escrow {
        id,
        sender,
        recipient,
        exchange_key,
    } = escrow;

    assert!(recipient == ctx.sender(), EMismatchedSenderRecipient);
    assert!(exchange_key == object::id(&key), EMismatchedExchangeObject);

    transfer::public_transfer(locked.unlock(key), sender);

    event::emit(EscrowSwapped {
        escrow_id: id.to_inner(),
    });

    id.delete();

    escrowed
}

public fun return_to_sender<T: key + store>(mut escrow: Escrow<T>, ctx: &TxContext): T {
    event::emit(EscrowCancelled {
        escrow_id: object::id(&escrow),
    });

    let escrowed = dof::remove<EscrowedObjectKey, T>(&mut escrow.id, EscrowedObjectKey {});

    let Escrow {
        id,
        sender,
        recipient: _,
        exchange_key: _,
    } = escrow;

    assert!(sender == ctx.sender(), EMismatchedSenderRecipient);
    id.delete();
    escrowed
}
- Concepts: Events in The Move Book
- Guide: 이벤트 사용하기
이제 sources folder 안에 shared.move와 lock.move 파일이 있다.
상위 escrow folder에서 terminal 또는 console에 sui move test를 실행한다.
성공하면 다음과 비슷한 응답을 받아 package가 build되고 test가 통과했음을 확인할 수 있다:
INCLUDING DEPENDENCY Sui
INCLUDING DEPENDENCY MoveStdlib
BUILDING escrow
Running Move unit tests
[ PASS    ] escrow::lock::test_lock_key_mismatch
[ PASS    ] escrow::shared::test_mismatch_object
[ PASS    ] escrow::lock::test_lock_unlock
[ PASS    ] escrow::shared::test_mismatch_sender
[ PASS    ] escrow::shared::test_object_tamper
[ PASS    ] escrow::shared::test_return_to_sender
[ PASS    ] escrow::shared::test_return_to_sender_failed_swap
[ PASS    ] escrow::shared::test_successful_swap
Test result: OK. Total tests: 8; passed: 8; failed: 0
Next steps
Move package를 작성했다. 🎉
이를 완전한 앱으로 만들려면 frontend를 만들어야 한다. 그러나 frontend가 업데이트되려면 escrows가 생성되고 swaps가 이행될 때 블록체인을 listen해야 한다.
이를 위해 다음 단계에서 indexing 서비스를 만든다.
Backend indexer
이제 contract가 events를 내보내도록 조정되었으므로, 모든 활성 Escrow object를 추적하고 sender나 recipient 기준으로 object를 조회하는 API를 노출하는 indexer를 작성할 수 있다.
indexer는 다음 schema를 가진 Prisma DB를 기반으로 한다:
schema.prisma
schema.prisma// This is your Prisma schema file,
// learn more about it in the docs: https://pris.ly/d/prisma-schema
generator client {
provider = "prisma-client-js"
}
/// We can setup the provider to our database
/// For this DEMO, we're using sqlite, which allows us to not
/// have external dependencies.
datasource db {
provider = "sqlite"
url = "file:./dev.db"
}
/// Our `Locked` objects list
model Locked {
// Keeping an ID so we can use as a pagination cursor
// There's an issue with BigInt for sqlite, so we're using a plain ID.
id Int @id @default(autoincrement())
objectId String @unique
keyId String?
creator String?
itemId String?
deleted Boolean @default(false)
@@index([creator])
@@index([deleted])
}
/// Our swap objects list
model Escrow {
// Keeping an ID so we can use as a pagination cursor
// There's an issue with BigInt for sqlite, so we're using a plain ID.
id Int @id @default(autoincrement())
objectId String @unique
sender String?
recipient String?
keyId String?
itemId String?
swapped Boolean @default(false)
cancelled Boolean @default(false)
@@index([recipient])
@@index([sender])
}
/// Saves the latest cursor for a given key.
model Cursor {
id String @id
eventSeq String
txDigest String
}
indexer의 핵심은 setupListeners라는 함수에서 초기화되는 event loop이다.
import { setupListeners } from './indexer/event-indexer';

setupListeners();
indexer는 escrow module과 관련된 이벤트를 queryEvent filter로 조회하고, 이미 처리한 최신 이벤트를 나타내는 cursor를 추적하여 재시작되더라도 올바른 위치에서 indexing을 이어갈 수 있다.
이 filter는 Move package의 escrow module에서 나온 타입의 이벤트를 찾는다(아래에 나오는 event-indexer.ts 코드를 참조��한다).
핵심 event job은 polling 방식으로 동작한다. 최신 cursor 다음의 이벤트를 RPC에서 조회해 callback으로 보내 처리한다. 새 이벤트가 한 페이지보다 많다고 감지되면 즉시 다음 페이지를 요청한다. 그렇지 않으면 다음 polling interval이 올 때까지 기다렸다가 다시 확인한다.
event-indexer.ts
event-indexer.tsimport { EventId, SuiClient, SuiEvent, SuiEventFilter } from '@mysten/sui/client';
import { CONFIG } from '../config';
import { prisma } from '../db';
import { getClient } from '../sui-utils';
import { handleEscrowObjects } from './escrow-handler';
import { handleLockObjects } from './locked-handler';
type SuiEventsCursor = EventId | null | undefined;
type EventExecutionResult = {
cursor: SuiEventsCursor;
hasNextPage: boolean;
};
type EventTracker = {
// The module that defines the type, with format `package::module`
type: string;
filter: SuiEventFilter;
callback: (events: SuiEvent[], type: string) => any;
};
const EVENTS_TO_TRACK: EventTracker[] = [
{
type: `${CONFIG.SWAP_CONTRACT.packageId}::lock`,
filter: {
MoveEventModule: {
module: 'lock',
package: CONFIG.SWAP_CONTRACT.packageId,
},
},
callback: handleLockObjects,
},
{
type: `${CONFIG.SWAP_CONTRACT.packageId}::shared`,
filter: {
MoveEventModule: {
module: 'shared',
package: CONFIG.SWAP_CONTRACT.packageId,
},
},
callback: handleEscrowObjects,
},
];
const executeEventJob = async (
client: SuiClient,
tracker: EventTracker,
cursor: SuiEventsCursor,
): Promise<EventExecutionResult> => {
try {
// get the events from the chain.
// For this implementation, we are going from start to finish.
// This will also allow filling in a database from scratch!
const { data, hasNextPage, nextCursor } = await client.queryEvents({
query: tracker.filter,
cursor,
order: 'ascending',
});
// handle the data transformations defined for each event
await tracker.callback(data, tracker.type);
// We only update the cursor if we fetched extra data (which means there was a change).
if (nextCursor && data.length > 0) {
await saveLatestCursor(tracker, nextCursor);
return {
cursor: nextCursor,
hasNextPage,
};
}
} catch (e) {
console.error(e);
}
// By default, we return the same cursor as passed in.
return {
cursor,
hasNextPage: false,
};
};
const runEventJob = async (client: SuiClient, tracker: EventTracker, cursor: SuiEventsCursor) => {
const result = await executeEventJob(client, tracker, cursor);
// Trigger a timeout. Depending on the result, we either wait 0ms or the polling interval.
setTimeout(
() => {
runEventJob(client, tracker, result.cursor);
},
result.hasNextPage ? 0 : CONFIG.POLLING_INTERVAL_MS,
);
};
/**
* Gets the latest cursor for an event tracker, either from the DB (if it's undefined)
* or from the running cursors.
*/
const getLatestCursor = async (tracker: EventTracker) => {
const cursor = await prisma.cursor.findUnique({
where: {
id: tracker.type,
},
});
return cursor || undefined;
};
/**
* Saves the latest cursor for an event tracker to the db, so we can resume
* from there.
* */
const saveLatestCursor = async (tracker: EventTracker, cursor: EventId) => {
const data = {
eventSeq: cursor.eventSeq,
txDigest: cursor.txDigest,
};
return prisma.cursor.upsert({
where: {
id: tracker.type,
},
update: data,
create: { id: tracker.type, ...data },
});
};
/// Sets up all the listeners for the events we want to track.
/// They are polling the RPC endpoint every second.
export const setupListeners = async () => {
for (const event of EVENTS_TO_TRACK) {
runEventJob(getClient(CONFIG.NETWORK), event, await getLatestCursor(event));
}
};
callback은 event를 읽고 그에 맞게 database를 업데이트하는 책임을 가진다.
데모 목적상 SQLite를 사용하므로 escrow된 각 object마다 database에 별도의 UPSERT를 실행해야 한다.
그러나 production 환경에서는 데이터 흐름을 최적화하기 위해 database 요청을 배치 처리하는 편이 바람직하다.
escrow-handler.ts
escrow-handler.tsimport { SuiEvent } from '@mysten/sui/client';
import { Prisma } from '@prisma/client';
import { prisma } from '../db';
type EscrowEvent = EscrowCreated | EscrowCancelled | EscrowSwapped;
type EscrowCreated = {
sender: string;
recipient: string;
escrow_id: string;
key_id: string;
item_id: string;
};
type EscrowSwapped = {
escrow_id: string;
};
type EscrowCancelled = {
escrow_id: string;
};
/**
* Handles all events emitted by the `escrow` module.
* Data is modelled in a way that allows writing to the db in any order (DESC or ASC) without
* resulting in data inconsistencies.
* We're constructing the updates to support multiple events involving a single record
* as part of the same batch of events (but using a single write/record to the DB).
* */
export const handleEscrowObjects = async (events: SuiEvent[], type: string) => {
const updates: Record<string, Prisma.EscrowCreateInput> = {};
for (const event of events) {
if (!event.type.startsWith(type)) throw new Error('Invalid event module origin');
const data = event.parsedJson as EscrowEvent;
if (!Object.hasOwn(updates, data.escrow_id)) {
updates[data.escrow_id] = {
objectId: data.escrow_id,
};
}
// Escrow cancellation case
if (event.type.endsWith('::EscrowCancelled')) {
const data = event.parsedJson as EscrowCancelled;
updates[data.escrow_id].cancelled = true;
continue;
}
// Escrow swap case
if (event.type.endsWith('::EscrowSwapped')) {
const data = event.parsedJson as EscrowSwapped;
updates[data.escrow_id].swapped = true;
continue;
}
const creationData = event.parsedJson as EscrowCreated;
// Handle creation event
updates[data.escrow_id].sender = creationData.sender;
updates[data.escrow_id].recipient = creationData.recipient;
updates[data.escrow_id].keyId = creationData.key_id;
updates[data.escrow_id].itemId = creationData.item_id;
}
// As part of the demo and to avoid having external dependencies, we use SQLite as our database.
// Prisma + SQLite does not support bulk insertion & conflict handling, so we have to insert these 1 by 1
// (resulting in multiple round-trips to the database).
// Always use a single `bulkInsert` query with proper `onConflict` handling in production databases (e.g Postgres)
const promises = Object.values(updates).map((update) =>
prisma.escrow.upsert({
where: {
objectId: update.objectId,
},
create: update,
update,
}),
);
await Promise.all(promises);
};
- Full source code
- Reference: JSON-RPC
API service
indexer가 수집한 데이터는 frontend가 읽을 수 있도록 API로 제공할 수 있다. 다음 절을 따라 TypeScript로 Node 위에서 실행되는 Express 기반 API를 구현한다.
Query parameters
API가 URL의 query string을 database WHERE query의 parameter로 받아들이기를 원한다.
따라서 URL query string을 추출해 Prisma에 유효한 query parameter로 파싱하는 utility가 필요하다.
parseWhereStatement() 함수는 caller가 URL query string에서 key 집합을 필터링하고, 해당 key-value 쌍을 Prisma가 이해하는 올바른 형식으로 변환할 수 있게 해준다.
api-queries.ts의 parseWhereStatement
api-queries.ts의 parseWhereStatementexport enum WhereParamTypes {
STRING,
NUMBER,
BOOLEAN,
}
export type WhereParam = {
	key: string;
	type: WhereParamTypes;
};
/** Parses a where statement based on the query params. */
export const parseWhereStatement = (query: Record<string, any>, acceptedParams: WhereParam[]) => {
	const params: Record<string, any> = {};
	for (const key of Object.keys(query)) {
		const whereParam = acceptedParams.find((x) => x.key === key);
		if (!whereParam) continue;

		const value = query[key];
		if (whereParam.type === WhereParamTypes.STRING) {
			params[key] = value;
		}
		if (whereParam.type === WhereParamTypes.NUMBER) {
			const number = Number(value);
			if (isNaN(number)) throw new Error(`Invalid number for ${key}`);

			params[key] = number;
		}

		// Handle boolean expected values.
		if (whereParam.type === WhereParamTypes.BOOLEAN) {
			let boolValue;
			if (value === 'true') boolValue = true;
			else if (value === 'false') boolValue = false;
			else throw new Error(`Invalid boolean for ${key}`);

			params[key] = boolValue;
		}
	}
	return params;
};
Query pagination
pagination은 API가 모든 데이터를 한꺼번에 반환하지 않고 충분하고 정렬된 chunk를 반환하도록 하기 위한 또 다른 핵심 요소이며, 이는 DDOS attack 벡터가 ��될 수 있는 문제를 방지한다.
WHERE parameter와 마찬가지로 URL query string에서 유효한 pagination parameter로 받아들일 key 집합을 정의한다.
parsePaginationForQuery() utility 함수는 미리 정한 key인 sort, limit, cursor를 필터링하고 해당 key-value 쌍을 Prisma가 소비할 수 있는 ApiPagination으로 파싱해 이를 돕는다.
이 예시에서는 후속 query가 다음 페이지를 이어서 가져올 수 있도록 database model의 id field를 cursor로 사용한다.
api-queries.ts의 parsePaginationForQuery
api-queries.ts의 parsePaginationForQueryexport type ApiPagination = {
take?: number;
orderBy: {
id: 'asc' | 'desc';
};
cursor?: {
id: number;
};
skip?: number;
};
/**
 * A helper to prepare pagination based on `req.query`.
 * We are doing only primary key cursor + ordering for this example.
 */
export const parsePaginationForQuery = (body: Record<string, any>) => {
	const pagination: ApiPagination = {
		orderBy: {
			id: Object.hasOwn(body, 'sort') && ['asc', 'desc'].includes(body.sort) ? body.sort : 'desc',
		},
	};

	// Prepare pagination limit (how many items to return)
	if (Object.hasOwn(body, 'limit')) {
		const requestLimit = Number(body.limit);

		if (isNaN(requestLimit)) throw new Error('Invalid limit value');

		pagination.take = requestLimit > CONFIG.DEFAULT_LIMIT ? CONFIG.DEFAULT_LIMIT : requestLimit;
	} else {
		pagination.take = CONFIG.DEFAULT_LIMIT;
	}

	// Prepare cursor pagination (which page to return)
	if (Object.hasOwn(body, 'cursor')) {
		const cursor = Number(body.cursor);
		if (isNaN(cursor)) throw new Error('Invalid cursor');
		pagination.skip = 1;
		pagination.cursor = {
			id: cursor,
		};
	}

	return pagination;
};
API endpoints
모든 endpoint는 server.ts에 정의되어 있다.
endpoint는 두 개이다:
-
Lockedobject를 조회하는/locked. 유효한 query key: -deleted: Boolean -creator: String -keyId: String -objectId: String -
Escrowobject를 조회하는/escrows. 유효한 query key: -cancelled: Boolean -swapped: Boolean -recipient: String -sender: String
URL query string을 미리 정의한 utility에 전달해 Prisma가 사용할 수 있는 올바른 parameter를 출력한다.
server.ts
server.tsimport cors from 'cors';
import express from 'express';
import { prisma } from './db';
import {
formatPaginatedResponse,
parsePaginationForQuery,
parseWhereStatement,
WhereParam,
WhereParamTypes,
} from './utils/api-queries';
const app = express();
app.use(cors());
app.use(express.json());
app.get('/', async (req, res) => {
return res.send({ message: '🚀 API is functional 🚀' });
});
app.get('/locked', async (req, res) => {
const acceptedQueries: WhereParam[] = [
{
key: 'deleted',
type: WhereParamTypes.BOOLEAN,
},
{
key: 'creator',
type: WhereParamTypes.STRING,
},
{
key: 'keyId',
type: WhereParamTypes.STRING,
},
{
key: 'objectId',
type: WhereParamTypes.STRING,
},
];
try {
const locked = await prisma.locked.findMany({
where: parseWhereStatement(req.query, acceptedQueries)!,
...parsePaginationForQuery(req.query),
});
return res.send(formatPaginatedResponse(locked));
} catch (e) {
console.error(e);
return res.status(400).send(e);
}
});
app.get('/escrows', async (req, res) => {
const acceptedQueries: WhereParam[] = [
{
key: 'cancelled',
type: WhereParamTypes.BOOLEAN,
},
{
key: 'swapped',
type: WhereParamTypes.BOOLEAN,
},
{
key: 'recipient',
type: WhereParamTypes.STRING,
},
{
key: 'sender',
type: WhereParamTypes.STRING,
},
];
try {
const escrows = await prisma.escrow.findMany({
where: parseWhereStatement(req.query, acceptedQueries)!,
...parsePaginationForQuery(req.query),
});
return res.send(formatPaginatedResponse(escrows));
} catch (e) {
console.error(e);
return res.status(400).send(e);
}
});
app.listen(3000, () => console.log(`🚀 Server ready at: http://localhost:3000`));
Deployment
이제 indexer와 API 서비스가 준비되었으므로 move package를 배포하고 indexer와 API 서비스를 시작할 수 있다.
-
pnpm install --ignore-workspace또는yarn install --ignore-workspace를 실행해 dependency를 설치한다. -
pnpm db:setup:dev또는yarn db:setup:dev를 실행해 database를 설정한다. -
Sui package를 배포한다
배포 지침
See "Hello, World!" for a more detailed guide on publishing packages or Sui Client CLI for a complete reference of client commands in the Sui CLI.
Before publishing your code, you must first initialize the Sui Client CLI, if you haven't already. To do so, in a terminal or console at the root directory of the project enter sui client. If you receive the following response, complete the remaining instructions:
Config file ["<FILE-PATH>/.sui/sui_config/client.yaml"] doesn't exist, do you want to connect to a Sui full node server [y/N]?
Enter y to proceed. You receive the following response:
Sui full node server URL (Defaults to Sui Testnet if not specified) :
Leave this blank (press Enter). You receive the following response:
Select key scheme to generate key pair (0 for ed25519, 1 for secp256k1, 2: for secp256r1):
Select 0. Now you should have a Sui address set up.
다음으로 Sui CLI가 활성 환경으로 testnet을 사용하도록 구성한다.
사용 가능한 환경 목록을 보려면 다음 명령을 사용한다:
$ sui client envs
아직 testnet 환경을 설정하지 않았다면 terminal 또는 console에서 다음 명령을 실행한다:
$ sui client new-env --alias testnet --rpc https://fullnode.testnet.sui.io:443
다음 명령을 실행해 testnet 환경을 활성화한다:
$ sui client switch --env testnet
package를 Testnet에 publish하려면 먼저 Testnet SUI token이 필요하다. 이를 받으려면 다음 명령을 실행한다:
$ sui client faucet
Testnet account에서 SUI를 얻는 다른 방법은 Faucet에서 SUI 받기를 참조한다.
이제 Testnet SUI가 들어 있는 account가 있으므로 contract를 배��포할 수 있다.
Testnet에서 데모 데이터를 만들 수 있도록 smart contract를 publish하는 helper 함수가 몇 가지 있다.
smart contract를 publish하는 helper 함수는 escrow와 demo 디렉터리 양쪽 모두에 build된 smart contract가 있기를 기대한다.
필요하다면 두 디렉터리에서 모두 sui move build를 실행한다.
환경에 맞는 올바른 source를 가리키도록 manifest의 Sui dependency를 반드시 업데이트한다.
smart contract를 publish하고 demo 데이터를 생성하려면:
apifolder에서 다음 명령을 실행해 smart contract를 publish한다:
$ npx ts-node helpers/publish-contracts.ts
성공하면 backend 루트 디렉터리에 demo-contract.json과 escrow-contract.json이 생성된다.
이 파일들은 contract address를 포함하며 backend와 frontend가 contract와 상호작용하는 데 사용된다.
- 잠기지 않은 demo object와 locked demo object를 생성한다
$ npx ts-node helpers/create-demo-data.ts
- demo escrow를 생성한다
$ npx ts-node helpers/create-demo-escrows.ts
database를 초기화하고 싶다면(예: 깨끗한 데모를 위해) pnpm db:reset:dev && pnpm db:setup:dev 또는 yarn db:reset:dev && yarn db:setup:dev를 실행한다.
-
pnpm dev또는yarn dev를 실행해 API와 indexer를 모두 실행한다. -
http://localhost:3000/escrows 또는 http://localhost:3000/locked에 접속한다
이제 indexer가 실행 중이어야 한다.
localhost:3000에 접속하면 서비스가 실행 중이라는 메시지{"message":"🚀 API is functional 🚀"}��를 받는다.localhost:3000/escrows에 접속하면 helper script가 만들어 둔 demo escrow 데이터를 볼 수 있다. 마찬가지로http://localhost:3000/locked에 접속하면 script가 demo object용으로 만든 raw JSON이 표시된다.
Next steps
코드가 Testnet에 성공적으로 배포되었으므로 이제 trading 데이터를 표시하고 사용자가 Move module과 상호작용할 수 있게 하는 create a frontend를 만들 수 있다.
Frontend
앱 예시의 마지막 부분에서는 최종 사용자가 거래를 발견하고 등록된 escrow와 상호작용할 수 있는 frontend(UI)를 구축한다.
- Prerequisites
-
Complete the smart contracts하고 그 설계를 이해한다.
-
온체인 데이터를 index하고 API를 통해 노출하는 방법을 배우기 위해 Implement the backend를 완료한다.
-
Deploy your smart contracts and started the backend indexer.
You can view the complete source code for this app example in the Sui repository.
- TypeScript로 Sui와 상호작용하는 기본 사용법은 Sui TypeScript SDK를 참조한다.
- React.js와 함께 Sui ecosystem에서 앱을 개발하기 위한 기본 building block을 배우려면 Sui dApp Kit를 참조한다.
- 이 프로젝트 안에서 React 기반 Sui 앱을 빠르게 scaffold하기 위해 사용되는
@mysten/dapp를 참조한다.
Overview
UI 디자인은 세 부분으로 구성된다:
- 사용자가 지갑을 연결하고 다른 페이지로 이동할 수 있게 하는 버튼을 포함한 header
- 사용자가 escrow 거래를 준비할 수 있도록 자신이 소유한 object를 관리하는
Manage Objects영역 - 사용자가 거래를 발견하고 만들고 실행할 수 있도록 하는
Escrows영역
Scaffold a new app
첫 번째 단계는 client app을 설정하는 것이다.
frontend folder에서 다음 명령을 실행해 새 앱을 scaffold한다.
- PNPM
- Yarn
$ pnpm create @mysten/dapp --template react-client-dapp
$ yarn create @mysten/dapp --template react-client-dapp
앱 이름을 물으면 원하는 이름을 제공한다. 앱 scaffold는 제공한 이름의 새 디렉터리에 생성된다. 이 방식은 이미 이 folder를 채우고 있을 수 있는 예시 source code와 작업 코드를 분리하는 데 편리하다. 이후 나오는 codeblock은 기본 예시 위치의 코드를 가리킨다. 자신의 코드는 제공한 앱 이름이 포함된 경로를 갖는다는 점을 염두에 둔다.
Setting up import aliases
먼저 import alias를 설정해 코드를 더 읽기 쉽고 유지보수하기 쉽게 만든다.
이렇게 하면 상대 경로 대신 @/를 사용해 파일을 import할 수 있다.
tsconfig.json의 내용을 다음과 같이 교체한다:
tsconfig.json의 내용을 다음과 같이 교체한다:{
"compilerOptions": {
"target": "ES2020",
"useDefineForClassFields": true,
"lib": ["ES2020", "DOM", "DOM.Iterable"],
"module": "ESNext",
"skipLibCheck": true,
/* Bundler mode */
"moduleResolution": "bundler",
"allowImportingTsExtensions": true,
"resolveJsonModule": true,
"isolatedModules": true,
"noEmit": true,
"jsx": "react-jsx",
/* Linting */
"strict": true,
"noUnusedLocals": true,
"noUnusedParameters": true,
"noFallthroughCasesInSwitch": true,
"baseUrl": ".",
"paths": {
"@/*": ["./src/*"]
}
},
"include": ["src"]
}
compilerOptions 아래의 paths 옵션이 TypeScript aliasing을 정의한다.
여기서는 alias @/*를 ./src/* 디렉터리에 매핑하므로, @/를 사용할 때마다 TypeScript는 이를 src folder를 가리키는 참조로 해석한다.
이 설정은 project에서 파일을 import할 때 긴 상대 경로를 줄여 준다.
vite.config.ts의 내용을 다음과 같이 교체한다:
vite.config.ts의 내용을 다음과 같이 교체한다:import { defineConfig } from "vite";
import react from "@vitejs/plugin-react-swc";
// https://vitejs.dev/config/
export default defineConfig({
plugins: [react()],
resolve: {
alias: {
"@": "/src",
},
},
});
Vite도 build 과정에서 import를 올바르게 resolve하려면 aliasing을 알고 있어야 한다.
vite.config.ts의 resolve.alias 설정에서 alias @를 /src 디렉터리에 매핑한다.
Adding Tailwind CSS
스타일링 과정을 단순화하고 codebase를 깔끔하고 유지보수하기 쉽게 유지하기 위해 이 가이드는 utility-first CSS class를 제공해 custom design을 빠르게 구축할 수 있게 해주는 Tailwind CSS를 사용한다. 앱 project의 루트에서 다음 명령을 실행해 Tailwind CSS와 dependency를 추가한다:
- PNPM
- Yarn
$ pnpm add tailwindcss@latest postcss@latest autoprefixer@latest
$ yarn add tailwindcss@latest postcss@latest autoprefixer@latest
다음으로 다음 명령을 실행해 Tailwind CSS configuration file을 생성한다:
$ npx tailwindcss init -p
tailwind.config.js의 내용을 다음과 같이 교체한다:
tailwind.config.js의 내용을 다음과 같이 교체한다:// eslint-disable-next-line import/no-anonymous-default-export
export default {
content: ["./index.html", "./src/**/*.{js,ts,jsx,tsx}"],
theme: {
extend: {},
},
plugins: [],
};
src/styles/ 디렉터리를 추가하고 base.css를 넣는다:
src/styles/ 디렉터리를 추가하고 base.css를 넣는다:@tailwind base;
@tailwind components;
@tailwind utilities;
.connect-wallet-wrapper > button {
@apply !bg-transparent !shadow-none !flex-shrink-0 !py-2 !px-3 !text-sm;
}
.sui-object-card .rt-CardInner {
@apply flex flex-col justify-between;
}
Connecting your deployed package
먼저 scripts in the api directory를 통해 package를 배포한다.
그런 다음 src/constants.ts 파일을 만들고 다음 내용을 채운다:
src/constants.ts 파일을 만들고 다음 내용을 채운다:// You can choose a different env (e.g. using a .env file, or a predefined list)
/** @ts-ignore */
import demoContract from "../../api/demo-contract.json";
/** @ts-ignore */
import escrowContract from "../../api/escrow-contract.json";
export enum QueryKey {
Locked = "locked",
Escrow = "escrow",
GetOwnedObjects = "getOwnedObjects",
}
export const CONSTANTS = {
escrowContract: {
...escrowContract,
lockedType: `${escrowContract.packageId}::lock::Locked`,
lockedKeyType: `${escrowContract.packageId}::lock::Key`,
lockedObjectDFKey: `${escrowContract.packageId}::lock::LockedObjectKey`,
},
demoContract: {
...demoContract,
demoBearType: `${demoContract.packageId}::demo_bear::DemoBear`,
},
apiEndpoint: "http://localhost:3000/",
};
project 이름을 사용해 앱을 만들었고 그래서 src 파일이 frontend의 하위 folder 안에 있다면 import 문에 한 단계 더 nesting된(../) 경로를 추가해야 한다.
Add helper functions and UI components
src/utils/ 디렉터��리를 만들고 다음 파일을 추가한다:
src/utils/ 디렉터��리를 만들고 다음 파일을 추가한다:/**
* Takes an object of { key: value } and builds a URL param string.
* e.g. { page: 1, limit: 10 } -> ?page=1&limit=10
*/
export const constructUrlSearchParams = (
object: Record<string, string>,
): string => {
const searchParams = new URLSearchParams();
for (const key in object) {
searchParams.set(key, object[key]);
}
return `?${searchParams.toString()}`;
};
/** Checks whether we have a next page */
export const getNextPageParam = (lastPage: any) => {
if ("api" in lastPage) {
return lastPage.api.cursor;
}
return lastPage.cursor;
};
src/components/ 디렉터리를 만들고 다음 component들을 추가한다:
ExplorerLink.tsx
ExplorerLink.tsximport { useSuiClientContext } from "@mysten/dapp-kit";
import { formatAddress } from "@mysten/sui/utils";
import { CheckIcon, CopyIcon } from "@radix-ui/react-icons";
import { useState } from "react";
import toast from "react-hot-toast";
/**
* A re-usable component for explorer links that offers
* a copy to clipboard functionality.
*/
export function ExplorerLink({
id,
isAddress,
}: {
id: string;
isAddress?: boolean;
}) {
const [copied, setCopied] = useState(false);
const { network } = useSuiClientContext();
const link = `https://suiexplorer.com/${
isAddress ? "address" : "object"
}/${id}?network=${network}`;
const copy = () => {
navigator.clipboard.writeText(id);
setCopied(true);
setTimeout(() => {
setCopied(false);
}, 2000);
toast.success("Copied to clipboard!");
};
return (
<span className="flex items-center gap-3">
{copied ? (
<CheckIcon />
) : (
<CopyIcon
height={12}
width={12}
className="cursor-pointer"
onClick={copy}
/>
)}
<a href={link} target="_blank" rel="noreferrer">
{formatAddress(id)}
</a>
</span>
);
}
InfiniteScrollArea.tsx
InfiniteScrollArea.tsximport { Button } from "@radix-ui/themes";
import { ReactNode, useEffect, useRef } from "react";
import { Loading } from "./Loading";
/**
* An infinite scroll area that calls `loadMore()` when the user scrolls to the bottom.
* Helps build easy infinite scroll areas for paginated data.
*/
export function InfiniteScrollArea({
children,
loadMore,
loading = false,
hasNextPage,
gridClasses = "py-6 grid-cols-1 md:grid-cols-2 gap-5",
}: {
children: ReactNode | ReactNode[];
loadMore: () => void;
loading: boolean;
hasNextPage: boolean;
gridClasses?: string;
}) {
const observerTarget = useRef(null);
// implement infinite loading.
useEffect(() => {
const observer = new IntersectionObserver(
(entries) => {
if (entries[0].isIntersecting) {
loadMore();
}
},
{ threshold: 1 },
);
if (observerTarget.current) {
observer.observe(observerTarget.current);
}
return () => {
if (observerTarget.current) {
// eslint-disable-next-line react-hooks/exhaustive-deps
observer.unobserve(observerTarget.current);
}
};
}, [observerTarget, loadMore]);
if (!children || (Array.isArray(children) && children.length === 0))
return <div className="p-3">No results found.</div>;
return (
<>
<div className={`grid ${gridClasses}`}>{children}</div>
<div className="col-span-2 text-center">
{loading && <Loading />}
{hasNextPage && !loading && (
<Button
ref={observerTarget}
color="gray"
className="cursor-pointer"
onClick={loadMore}
disabled={!hasNextPage || loading}
>
Load more...
</Button>
)}
</div>
</>
);
}
Loading.tsx
Loading.tsx/**
* A loading spinner that can be re-used across the app.
*/
export function Loading() {
return (
<div role="status" className="text-center ">
<svg
aria-hidden="true"
className="w-8 h-8 text-gray-200 animate-spin fill-gray-900 mx-auto my-3"
viewBox="0 0 100 101"
fill="none"
xmlns="http://www.w3.org/2000/svg"
>
<path
d="M100 50.5908C100 78.2051 77.6142 100.591 50 100.591C22.3858 100.591 0 78.2051 0 50.5908C0 22.9766 22.3858 0.59082 50 0.59082C77.6142 0.59082 100 22.9766 100 50.5908ZM9.08144 50.5908C9.08144 73.1895 27.4013 91.5094 50 91.5094C72.5987 91.5094 90.9186 73.1895 90.9186 50.5908C90.9186 27.9921 72.5987 9.67226 50 9.67226C27.4013 9.67226 9.08144 27.9921 9.08144 50.5908Z"
fill="currentColor"
/>
<path
d="M93.9676 39.0409C96.393 38.4038 97.8624 35.9116 97.0079 33.5539C95.2932 28.8227 92.871 24.3692 89.8167 20.348C85.8452 15.1192 80.8826 10.7238 75.2124 7.41289C69.5422 4.10194 63.2754 1.94025 56.7698 1.05124C51.7666 0.367541 46.6976 0.446843 41.7345 1.27873C39.2613 1.69328 37.813 4.19778 38.4501 6.62326C39.0873 9.04874 41.5694 10.4717 44.0505 10.1071C47.8511 9.54855 51.7191 9.52689 55.5402 10.0491C60.8642 10.7766 65.9928 12.5457 70.6331 15.2552C75.2735 17.9648 79.3347 21.5619 82.5849 25.841C84.9175 28.9121 86.7997 32.2913 88.1811 35.8758C89.083 38.2158 91.5421 39.6781 93.9676 39.0409Z"
fill="currentFill"
/>
</svg>
<span className="sr-only">Loading...</span>
</div>
);
}
SuiObjectDisplay.tsx
SuiObjectDisplay.tsximport { SuiObjectData } from "@mysten/sui/client";
import { Avatar, Box, Card, Flex, Inset, Text } from "@radix-ui/themes";
import { ReactNode } from "react";
import { ExplorerLink } from "./ExplorerLink";
/**
* A Card component to view an object's Display (from on-chain data).
* It includes a label on the top right of the card that can be styled.
*
* It also allows for children to be passed in, which will be displayed
* below the object's display in a footer-like design.
*
*/
export function SuiObjectDisplay({
object,
children,
label,
labelClasses,
}: {
object?: SuiObjectData;
children?: ReactNode | ReactNode[];
label?: string;
labelClasses?: string;
}) {
const display = object?.display?.data;
return (
<Card className="!p-0 sui-object-card">
{label && (
<div className={`absolute top-0 right-0 m-2 ${labelClasses}`}>
{label}
</div>
)}
<Flex gap="3" align="center">
<Avatar size="6" src={display?.image_url} radius="full" fallback="O" />
<Box className="grid grid-cols-1">
<Text className="text-xs">
<ExplorerLink id={object?.objectId || ""} isAddress={false} />
</Text>
<Text as="div" size="2" weight="bold">
{display?.name || display?.title || "-"}
</Text>
<Text as="div" size="2" color="gray">
{display?.description || "No description for this object."}
</Text>
</Box>
</Flex>
{children && (
<Inset className="p-2 border-t mt-3 bg-gray-100 rounded-none">
{children}
</Inset>
)}
</Card>
);
}
필요한 dependency를 설치한다:
- PNPM
- Yarn
$ pnpm add react-hot-toast
$ yarn add react-hot-toast
Set up routing
import한 template에는 페이지가 하나뿐이다. 더 많은 페이지를 추가하려면 routing을 설정해야 한다.
먼저 필요한 dependency를 설치한다:
- PNPM
- Yarn
$ pnpm add react-router-dom
$ yarn add react-router-dom
그런 다음 src/routes/ 디렉터리를 만들고 index.tsx를 추가한다. 이 파일은 routing 구성을 담고 있다:
src/routes/ 디렉터리를 만들고 index.tsx를 추가한다. 이 파일은 routing 구성을 담고 있다:import { createBrowserRouter, Navigate } from "react-router-dom";
import { Root } from "./root";
import { LockedDashboard } from "@/routes/LockedDashboard";
import { EscrowDashboard } from "@/routes/EscrowDashboard";
export const router = createBrowserRouter([
{
path: "/",
element: <Root />,
children: [
{
path: "/",
element: <Navigate to="escrows" replace />,
},
{
path: "escrows",
element: <EscrowDashboard />,
},
{
path: "locked",
element: <LockedDashboard />,
},
],
},
]);
src/routes/ 디렉터리에 다음 파일들을 각각 추가한다:
root.tsx. 이 파일은 모든 페이지에서 렌더링되는 root component를 담고 있다:
root.tsx. 이 파일은 모든 페이지에서 렌더링되는 root component를 담고 있다:import { Toaster } from "react-hot-toast";
import { Outlet } from "react-router-dom";
import { Header } from "@/components/Header";
import { Container } from "@radix-ui/themes";
export function Root() {
return (
<div>
<Toaster position="bottom-center" />
<Header />
<Container py="8">
<Outlet />
</Container>
</div>
);
}
LockedDashboard.tsx. 이 파일은 Manage Objects 페이지용 component를 담고 있다.
LockedDashboard.tsx. 이 파일은 Manage Objects 페이지용 component를 담고 있다.export function LockedDashboard() {
return (
<div>
<h1>Locked Dashboard</h1>
</div>
);
}
EscrowDashboard.tsx. 이 파일은 Escrows 페이지용 component를 담고 있다.
EscrowDashboard.tsx. 이 파일은 Escrows 페이지용 component를 담고 있다.export function EscrowDashboard() {
return (
<div>
<h1>Escrow Dashboard</h1>
</div>
);
}
src/main.tsx에서 App component를 RouterProvider로 교체하고 Theme component의 "dark"를 "light"로 바꿔 업데이트한다:
src/main.tsx에서 App component를 RouterProvider로 교체하고 Theme component의 "dark"를 "light"로 바꿔 업데이트한다:import React from "react";
import ReactDOM from "react-dom/client";
import "@mysten/dapp-kit/dist/index.css";
import "@radix-ui/themes/styles.css";
import "./styles/base.css";
import { getFullnodeUrl } from "@mysten/sui/client";
import {
SuiClientProvider,
WalletProvider,
createNetworkConfig,
} from "@mysten/dapp-kit";
import { QueryClient, QueryClientProvider } from "@tanstack/react-query";
import { Theme } from "@radix-ui/themes";
import { router } from "@/routes/index.tsx";
import { RouterProvider } from "react-router-dom";
const queryClient = new QueryClient();
const { networkConfig } = createNetworkConfig({
localnet: { url: getFullnodeUrl("localnet") },
devnet: { url: getFullnodeUrl("devnet") },
testnet: { url: getFullnodeUrl("testnet") },
mainnet: { url: getFullnodeUrl("mainnet") },
});
ReactDOM.createRoot(document.getElementById("root")!).render(
<React.StrictMode>
<Theme appearance="light">
<QueryClientProvider client={queryClient}>
<SuiClientProvider networks={networkConfig} defaultNetwork="testnet">
<WalletProvider autoConnect>
<RouterProvider router={router} />
</WalletProvider>
</SuiClientProvider>
</QueryClientProvider>
</Theme>
</React.StrictMode>,
);
dApp Kit은 Sui 블록체인에 query 및 mutation 호출을 수행하기 위한 hook 집합을 제공한��다.
이 hook들은 @tanstack/react-query의 query 및 mutation hook 위에 놓인 얇은 wrapper이다.
- Docs: 웹사이트에서 서로 다른 route로 이동하는 데 사용하는 React Router
- Docs: TanStack Query
src/components/Header.tsx를 만든다. 이 파일은 navigation link와 connect wallet button을 담고 있다:
src/components/Header.tsx를 만든다. 이 파일은 navigation link와 connect wallet button을 담고 있다:import { ConnectButton } from '@mysten/dapp-kit-react';
import { SizeIcon } from '@radix-ui/react-icons';
import { Box, Container, Flex, Heading } from '@radix-ui/themes';
import { NavLink } from 'react-router-dom';
const menu = [
{
title: 'Escrows',
link: '/escrows',
},
{
title: 'Manage Objects',
link: '/locked',
},
];
export function Header() {
return (
<Container>
<Flex position="sticky" px="4" py="2" justify="between" className="border-b flex flex-wrap">
<Box>
<Heading className="flex items-center gap-3">
<SizeIcon width={24} height={24} />
Trading Demo
</Heading>
</Box>
<Box className="flex gap-5 items-center">
{menu.map((item) => (
<NavLink
key={item.link}
to={item.link}
className={({ isActive, isPending }) =>
`cursor-pointer flex items-center gap-2 ${
isPending ? 'pending' : isActive ? 'font-bold text-blue-600' : ''
}`
}
>
{item.title}
</NavLink>
))}
</Box>
<Box className="connect-wallet-wrapper">
<ConnectButton />
</Box>
</Flex>
</Container>
);
}
dApp Kit에는 지갑 연결과 연결 해제를 위한 버튼을 표시하는 미리 만들어진 React.js component인 ConnectButton이 들어 있다.
지갑 연결과 연결 해제 로직은 매끄럽게 처리되므로 같은 로직을 곳곳에 반복해 작성할 필요가 없다.
이 시점에서 기본 routing 구성이 준비되어야 한다. 앱을 실행하고 다음이 가능한지 확인한다:
Manage Objects와Escrows페이지 사이를 이동할 수 있다.- 지갑을 연결하고 연결 해제할 수 있다.
스타일이 적용되어야 한다.
Header component는 다음과 같이 보여야 한다:

Type definitions
모든 타입 정의는 src/types/types.ts에 있다. 이 파일을 만들고 다음 내용을 추가한다:
src/types/types.ts에 있다. 이 파일을 만들고 다음 내용을 추가한다:export type ApiLockedObject = {
id?: string;
objectId: string;
keyId: string;
creator?: string;
itemId: string;
deleted: boolean;
};
export type ApiEscrowObject = {
id: string;
objectId: string;
sender: string;
recipient: string;
keyId: string;
itemId: string;
swapped: boolean;
cancelled: boolean;
};
export type EscrowListingQuery = {
escrowId?: string;
sender?: string;
recipient?: string;
cancelled?: string;
swapped?: string;
limit?: string;
};
export type LockedListingQuery = {
deleted?: string;
keyId?: string;
limit?: string;
};
ApiLockedObject와 ApiEscrowObject는 indexing과 API 서비스가 반환하는 Locked 및 Escrow indexed data model을 나타낸다.
EscrowListingQuery와 LockedListingQuery는 각각 /escrow와 /locked endpoint에서 가져오도록 API 서비스에 제공하는 query parameter model이다.
Display owned objects
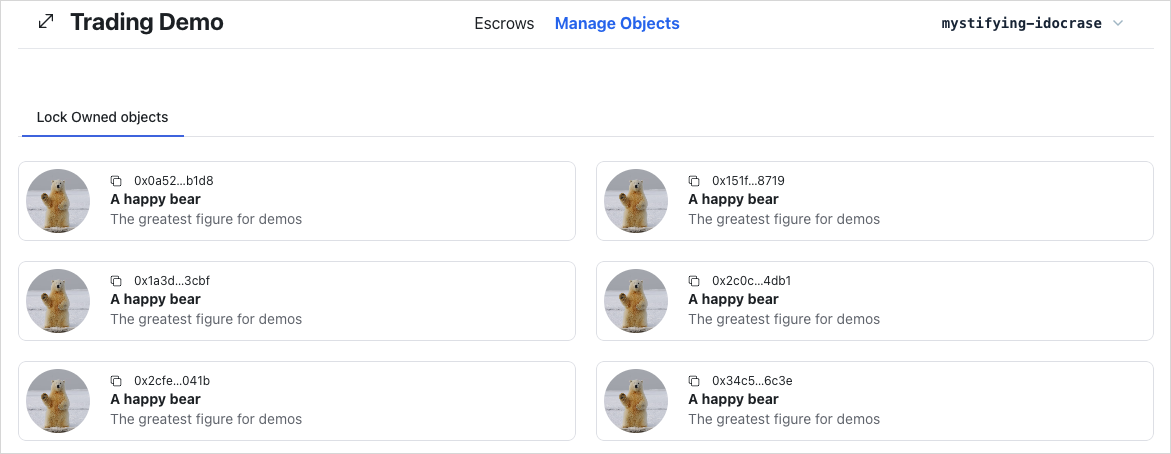
이제 연결된 wallet address가 소유한 object를 표시한다.
이것이 Manage Objects 페이지이다.
먼저 src/components/locked/LockOwnedObjects.tsx 파일을 추가한다:
src/components/locked/LockOwnedObjects.tsx 파일을 추가한다:import { useCurrentAccount, useCurrentClient } from '@mysten/dapp-kit-react';
import { useInfiniteQuery } from '@tanstack/react-query';
import { InfiniteScrollArea } from '@/components/InfiniteScrollArea';
import { SuiObjectDisplay } from '@/components/SuiObjectDisplay';
/**
* 연결된 wallet address가 소유한 모든 object를 가져오고
* 사용자가 이를 lock하여 escrow에 사용할 수 있게 하는 component이다.
*/
export function LockOwnedObjects() {
const account = useCurrentAccount();
const client = useCurrentClient();
const { data, fetchNextPage, isFetchingNextPage, hasNextPage, refetch } = useInfiniteQuery({
queryKey: ['listOwnedObjects', account?.address],
queryFn: async ({ pageParam }) => {
const result = await client.core.listOwnedObjects({
owner: account?.address!,
cursor: pageParam ?? undefined,
});
return result;
},
initialPageParam: null as string | null,
getNextPageParam: (lastPage) => (lastPage.hasNextPage ? lastPage.cursor : null),
enabled: !!account,
select: (data) => data.pages.flatMap((page) => page.objects),
});
return (
<InfiniteScrollArea
loadMore={() => fetchNextPage()}
hasNextPage={hasNextPage}
loading={isFetchingNextPage}
>
{data?.map((obj) => (
<SuiObjectDisplay key={obj.objectId} object={obj}></SuiObjectDisplay>
))}
</InfiniteScrollArea>
);
}
dApp Kit의 useCurrentClient() hook과 TanStack Query의 useInfiniteQuery를 사용해 Sui 블록체인에서 직접 owned object를 가져온다.
useCurrentClient() hook은 설정된 Sui client를 반환하며, 그 core.listOwnedObjects() method를 사용해 페이지 단위로 owned object를 가져온다.
연결된 wallet account를 owner로 전달한다.
반환된 데이터는 query key listOwnedObjects에 해당하는 cache에 저장된다.
이후 단계에서는 mutation이 성공한 뒤 이 cache를 invalidate하여 데이터가 자동으로 다시 fetch되도록 한다.
다음으로 LockOwnedObjects component를 포함하도록 src/routes/LockedDashboard.tsx를 업데이트한다:
LockOwnedObjects component를 포함하도록 src/routes/LockedDashboard.tsx를 업데이트한다:import { Tabs } from '@radix-ui/themes';
import { useState } from 'react';
import { LockOwnedObjects } from '@/components/locked/LockOwnedObjects';
export function LockedDashboard() {
const tabs = [
{
name: 'Lock Owned objects',
component: () => <LockOwnedObjects />,
},
];
const [tab, setTab] = useState(tabs[0].name);
return (
<Tabs.Root value={tab} onValueChange={setTab}>
<Tabs.List>
{tabs.map((tab, index) => {
return (
<Tabs.Trigger key={index} value={tab.name} className="cursor-pointer">
{tab.name}
</Tabs.Trigger>
);
})}
</Tabs.List>
{tabs.map((tab, index) => {
return (
<Tabs.Content key={index} value={tab.name}>
{tab.component()}
</Tabs.Content>
);
})}
</Tabs.Root>
);
}
앱을 실행하고 다음이 가능한지 확인한다:
- 연결된 wallet account의 owned object를 볼 수 있다.
object가 보이지 않으면 demo 데이터를 생성하거나 wallet을 연결해야 할 수 있다. 다음 단계를 마친 뒤에는 object를 mint할 수 있다.
Execute transaction hook
frontend에서는 transaction을 여러 위치에서 실행해야 할 수 있다. transaction 실행 로직을 추출해 어디서나 재사용한다. execute transaction hook을 만들고 살펴본다.
src/hooks/useTransactionExecution.ts를 만든다:
src/hooks/useTransactionExecution.ts를 만든다:import { useSignTransaction, useSuiClient } from "@mysten/dapp-kit";
import { SuiTransactionBlockResponse } from "@mysten/sui/client";
import { Transaction } from "@mysten/sui/transactions";
import toast from "react-hot-toast";
/**
* A hook to execute transactions.
* It signs the transaction using the wallet and executes it through the RPC.
*
* That allows read-after-write consistency and is generally considered a best practice.
*/
export function useTransactionExecution() {
const client = useSuiClient();
const { mutateAsync: signTransactionBlock } = useSignTransaction();
const executeTransaction = async (
txb: Transaction,
): Promise<SuiTransactionBlockResponse | void> => {
try {
const signature = await signTransactionBlock({
transaction: txb,
});
const res = await client.executeTransactionBlock({
transactionBlock: signature.bytes,
signature: signature.signature,
options: {
showEffects: true,
showObjectChanges: true,
},
});
toast.success("Successfully executed transaction!");
return res;
} catch (e: any) {
toast.error(`Failed to execute transaction: ${e.message as string}`);
}
};
return executeTransaction;
}
입력은 Transaction이다.
현재 연결된 wallet account로 서명하고, transaction을 실행하고, 실행 결과를 반환하며, 마지막으로 transaction �성공 여부를 나타내는 기본 toast 메시지를 표시한다.
src/main.tsx에 설정된 Sui client instance를 가져오기 위해 dApp Kit의 useCurrentClient() hook을 사용한다.
useSignTransaction() 함수는 현재 연결된 wallet을 사용해 transaction에 서명하는 데 도움이 되는 dApp kit의 또 다른 hook이다.
이 hook은 사용자가 선택한 wallet으로 transaction을 검토하고 서명하도록 UI를 표시한다.
transaction을 실행하려면 Sui TypeScript SDK의 client instance에서 executeTransaction()을 사용한다.
Generate demo data
demo bear smart contract의 전체 source code는 Trading Contracts Demo directory에서 확인할 수 있다.
UI에서 escrow 사용자 흐름을 직접 테스트하고 시연할 수 있도록 실제 세계의 asset을 나타내는 dummy object를 만드는 utility 함수가 필요하다.
src/mutations/demo.ts를 만든다:
src/mutations/demo.ts를 만든다:import { CONSTANTS, QueryKey } from "@/constants";
import { useTransactionExecution } from "@/hooks/useTransactionExecution";
import { useCurrentAccount } from "@mysten/dapp-kit";
import { Transaction } from "@mysten/sui/transactions";
import { useMutation, useQueryClient } from "@tanstack/react-query";
/**
* A mutation to generate demo data as part of our demo.
*/
export function useGenerateDemoData() {
const account = useCurrentAccount();
const executeTransaction = useTransactionExecution();
const queryClient = useQueryClient();
return useMutation({
mutationFn: async () => {
if (!account?.address)
throw new Error("You need to connect your wallet!");
const txb = new Transaction();
const bear = txb.moveCall({
target: `${CONSTANTS.demoContract.packageId}::demo_bear::new`,
arguments: [txb.pure.string(`A happy bear`)],
});
txb.transferObjects([bear], txb.pure.address(account.address));
return executeTransaction(txb);
},
onSuccess: () => {
queryClient.invalidateQueries({
queryKey: [QueryKey.GetOwnedObjects],
});
},
});
}
앞서 언급했듯이 이 예시는 @tanstack/react-query를 사용해 server state를 query하고 cache하고 mutate한다.
server state는 remote server에만 존재하는 데이터이며, 이를 가져오거나 업데이트하는 유일한 방법은 이러한 remote server와 상호작용하는 것이다.
이 경우 그것은 API일 수도 있고 Sui 블록체인 RPC일 수도 있다.
Sui 블록체인에서 데이터를 mutate하기 위한 transaction 호출을 실행할 때는 useMutation() hook을 사용한다.
useMutation() hook은 여러 입력을 받는다.
그러나 이 예시에서는 두 개만 필요하다.
첫 번째 parameter인 mutationFn은 주요 mutate 로직을 실행할 함수를 받고, 두 번째 parameter인 onSuccess는 mutate 로직이 성공했을 때 실행되는 callback이다.
주요 mutate 로직에는 demo_bear::new라는 package의 Move 호출을 실행해 dummy bear object를 만들고, 같은 Transaction 안에서 이를 연결된 wallet account로 전송하는 과정이 포함된다.
이 예시는 transaction을 실행하기 위해 Execute Transaction Hook 단계의 executeTransaction() hook을 재사용한다.
주요 mutate 로직을 useMutation() 안에 감싸는 또 다른 이점은 server state를 저장하는 cache에 접근하고 이를 조작할 수 있다는 점이다.
이 예시는 적절한 callback에서 query 호출을 사용해 remote server에서 cache를 가져온다.
이 경우에는 onSuccess callback이다.
transaction이 성공하면 listOwnedObjects라는 cache key의 cache 데이터를 invalidate하고, 그러면 @tanstack/react-query가 invalidated data에 대해 자동으로 re-fetch 메커니즘을 처리한다.
이를 위해 Set up Routing 단계에서 useQueryClient() hook으로 가져온 @tanstack/react-query configured client instance의 invalidateQueries()를 사용한다.
이제 dummy bear object를 만드는 로직은 존재한다. 이제 이 로직을 header의 버튼에 연결하기만 하면 된다.
Header.tsx
Header.tsximport { useGenerateDemoData } from "@/mutations/demo";
import { ConnectButton } from "@mysten/dapp-kit";
import { SizeIcon } from "@radix-ui/react-icons";
import { Box, Button, Container, Flex, Heading } from "@radix-ui/themes";
import { NavLink } from "react-router-dom";
const menu = [
{
title: "Escrows",
link: "/escrows",
},
{
title: "Manage Objects",
link: "/locked",
},
];
export function Header() {
const { mutate: demoBearMutation, isPending } = useGenerateDemoData();
return (
<Container>
<Flex
position="sticky"
px="4"
py="2"
justify="between"
className="border-b flex flex-wrap"
>
<Box>
<Heading className="flex items-center gap-3">
<SizeIcon width={24} height={24} />
Trading Demo
</Heading>
</Box>
<Box className="flex gap-5 items-center">
{menu.map((item) => (
<NavLink
key={item.link}
to={item.link}
className={({ isActive, isPending }) =>
`cursor-pointer flex items-center gap-2 ${
isPending
? "pending"
: isActive
? "font-bold text-blue-600"
: ""
}`
}
>
{item.title}
</NavLink>
))}
</Box>
<Box>
<Button
className="cursor-pointer"
disabled={isPending}
onClick={() => {
demoBearMutation();
}}
>
New Demo Bear
</Button>
</Box>
<Box className="connect-wallet-wrapper">
<ConnectButton />
</Box>
</Flex>
</Container>
);
}
앱을 실행하고 다음이 가능한지 확인한다:
- demo bear object를 mint하고
Manage Objectstab에서 볼 수 있다.
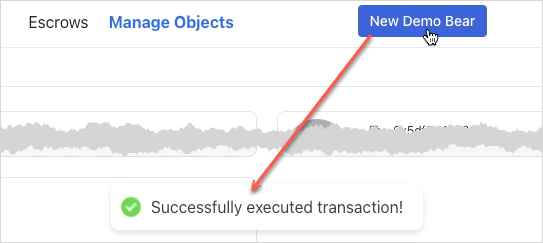
Locking owned objects
object를 lock하려면 {PACKAGE_ID}::lock::lock으로 식별되는 lock Move 함수를 실행한다.
구현 방식은 이전 mutation 함수와 비슷하다.
@tanstack/react-query의 useMutation()을 사용해 주요 로직을 감싼다.
lock 함수는 잠글 object와 그 type을 요구하는데, smart contract lock 함수가 generic이어서 type parameter가 필요하기 때문이다.
Locked object와 Key object를 만든 뒤에는 같은 transaction 안에서 이를 연결된 wallet account로 전송한다.
owned object를 잠그는 로직을 별도 mutate 함수로 분리해 discoverability와 캡슐화를 높인다.
src/mutations/locked.ts를 만든다:
src/mutations/locked.ts를 만든다:import { useCurrentAccount } from '@mysten/dapp-kit-react';
import { SuiObjectData } from '@mysten/sui/jsonRpc';
import { Transaction } from '@mysten/sui/transactions';
import { useMutation } from '@tanstack/react-query';
import { CONSTANTS } from '@/constants';
import { useTransactionExecution } from '@/hooks/useTransactionExecution';
/**
* object를 lock하기 위한 PTB를 빌드하고 실행한다.
*/
export function useLockObjectMutation() {
const account = useCurrentAccount();
const executeTransaction = useTransactionExecution();
return useMutation({
mutationFn: async ({ object }: { object: SuiObjectData }) => {
if (!account?.address) throw new Error('You need to connect your wallet!');
const txb = new Transaction();
const [locked, key] = txb.moveCall({
target: `${CONSTANTS.escrowContract.packageId}::lock::lock`,
arguments: [txb.object(object.objectId)],
typeArguments: [object.type!],
});
txb.transferObjects([locked, key], txb.pure.address(account.address));
return executeTransaction(txb);
},
});
}
useLockObjectMutation hook을 포함하도록 src/components/locked/LockOwnedObjects.tsx를 업데이트한다:
LockOwnedObjects.tsx
LockOwnedObjects.tsximport { useCurrentAccount, useSuiClientInfiniteQuery } from "@mysten/dapp-kit";
import { SuiObjectDisplay } from "@/components/SuiObjectDisplay";
import { Button } from "@radix-ui/themes";
import { LockClosedIcon } from "@radix-ui/react-icons";
import { InfiniteScrollArea } from "@/components/InfiniteScrollArea";
import { useLockObjectMutation } from "@/mutations/locked";
/**
* A component that fetches all the objects owned by the connected wallet address
* and allows the user to lock them, so they can be used in escrow.
*/
export function LockOwnedObjects() {
const account = useCurrentAccount();
const { mutate: lockObjectMutation, isPending } = useLockObjectMutation();
const { data, fetchNextPage, isFetchingNextPage, hasNextPage, refetch } =
useSuiClientInfiniteQuery(
"getOwnedObjects",
{
owner: account?.address!,
options: {
showDisplay: true,
showType: true,
},
},
{
enabled: !!account,
select: (data) =>
data.pages
.flatMap((page) => page.data)
.filter(
// we're filtering out objects that don't have Display or image_url
// for demo purposes. The Escrow contract works with all objects.
(x) => !!x.data?.display && !!x.data?.display?.data?.image_url,
),
},
);
return (
<InfiniteScrollArea
loadMore={() => fetchNextPage()}
hasNextPage={hasNextPage}
loading={isFetchingNextPage}
>
{data?.map((obj) => (
<SuiObjectDisplay object={obj.data!}>
<div className="p-4 pt-1 text-right flex items-center justify-between">
<p className="text-sm">
Lock the item so it can be used for escrows.
</p>
<Button
className="cursor-pointer"
disabled={isPending}
onClick={() => {
lockObjectMutation(
{ object: obj.data! },
{
onSuccess: () => refetch(),
},
);
}}
>
<LockClosedIcon />
Lock Item
</Button>
</div>
</SuiObjectDisplay>
))}
</InfiniteScrollArea>
);
}
앱을 실행하고 다음이 가능한지 확인한다:
- owned object를 lock할 수 있다.
object는 owned object 목록에서 사라져야 한다. 나중 단계에서 locked object를 보고 unlock할 수 있다.
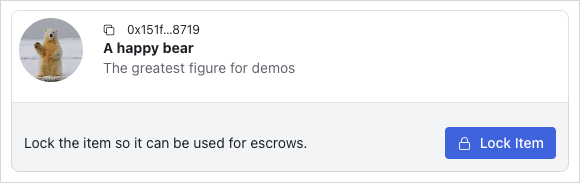
Display owned locked objects
src/components/locked/OwnedLockedList.tsx를 살펴보며 My Locked Objects tab을 확인한다.
이 목록을 가져오는 로직이 어떻게 동작하는지에 집중한다.
OwnedLockedList.tsx
OwnedLockedList.tsximport { CONSTANTS } from "@/constants";
import { InfiniteScrollArea } from "@/components/InfiniteScrollArea";
import { useCurrentAccount, useSuiClientInfiniteQuery } from "@mysten/dapp-kit";
import { LockedObject } from "./LockedObject";
/**
* Similar to the `ApiLockedList` but fetches the owned locked objects
* but fetches the objects from the on-chain state, instead of relying on the indexer API.
*/
export function OwnedLockedList() {
const account = useCurrentAccount();
const { data, isLoading, fetchNextPage, hasNextPage, isFetchingNextPage } =
useSuiClientInfiniteQuery(
"getOwnedObjects",
{
filter: {
StructType: CONSTANTS.escrowContract.lockedType,
},
owner: account?.address!,
options: {
showContent: true,
showOwner: true,
},
},
{
enabled: !!account?.address,
select: (data) => data.pages.flatMap((page) => page.data),
},
);
return (
<>
<InfiniteScrollArea
loadMore={() => fetchNextPage()}
hasNextPage={hasNextPage}
loading={isFetchingNextPage || isLoading}
>
{data?.map((item) => (
<LockedObject key={item.data?.objectId} object={item.data!} />
))}
</InfiniteScrollArea>
</>
);
}
이 query 패턴은 LockOwnedObjects component의 패턴과 비슷하다.
차이점은 owned object 대신 locked object를 가져온다는 점이다.
Locked object는 smart contract의 struct 타입이므로 query 호출에 struct type을 filter로 전달해야 한다.
struct type은 보통 {PACKAGE_ID}::{MODULE_NAME}::{STRUCT_TYPE} 형식으로 식별된다.
LockedObject and Locked component
<LockedObject />(src/components/locked/LockedObject.tsx) component는 주로 온체인 SuiObjectData Locked object를 대응하는 ApiLockedObject로 매핑하는 역할을 하며, 최종 렌더링은 <Locked /> component에 위임한다.
prop itemId가 제공되지 않았다면 <LockedObject />는 TanStack Query의 useQuery hook과 useCurrentClient() hook을 사용해 getDynamicFieldObject RPC endpoint를 호출하여 locked item object ID를 가져온다.
이 smart contract에서는 locked item이 dynamic object field에 들어 있다는 점을 떠올리면 된다.
LockedObject.tsx
LockedObject.tsximport { CONSTANTS } from "@/constants";
import { useSuiClientQuery } from "@mysten/dapp-kit";
import { Locked } from "./partials/Locked";
import { SuiObjectData } from "@mysten/sui/client";
/**
* Acts as a wrapper between the `Locked` object fetched from API
* and the on-chain object state.
*
* Accepts an `object` of type `::locked::Locked`, fetches the itemID (though the DOF)
* and then renders the `Locked` component.
*
* ItemId is optional because we trust the API to return the correct itemId for each Locked.
*/
export function LockedObject({
object,
itemId,
hideControls,
}: {
object: SuiObjectData;
itemId?: string;
hideControls?: boolean;
}) {
const owner = () => {
if (
!object.owner ||
typeof object.owner === "string" ||
!("AddressOwner" in object.owner)
)
return undefined;
return object.owner.AddressOwner;
};
const getKeyId = (item: SuiObjectData) => {
if (
!(item.content?.dataType === "moveObject") ||
!("key" in item.content.fields)
)
return "";
return item.content.fields.key as string;
};
// Get the itemID for the locked object (We've saved it as a DOF on the SC).
const suiObjectId = useSuiClientQuery(
"getDynamicFieldObject",
{
parentId: object.objectId,
name: {
type: CONSTANTS.escrowContract.lockedObjectDFKey,
value: {
dummy_field: false,
},
},
},
{
select: (data) => data.data,
enabled: !itemId,
},
);
return (
<Locked
locked={{
itemId: itemId || suiObjectId.data?.objectId!,
objectId: object.objectId,
keyId: getKeyId(object),
creator: owner(),
deleted: false,
}}
hideControls={hideControls}
/>
);
}
<Locked />(src/components/locked/partials/Locked.tsx) component는 주로 ApiLockedObject를 렌더링하는 역할을 맡는다.
이후에는 locked object를 unlock하고 locked object에서 escrow를 만드는 등 여러 온체인 상호작용도 포함하게 된다.
Locked.tsx
Locked.tsximport { useCurrentAccount, useCurrentClient } from '@mysten/dapp-kit-react';
import { useQuery } from '@tanstack/react-query';
import { SuiObjectDisplay } from '@/components/SuiObjectDisplay';
import { ApiLockedObject } from '@/types/types';
import { ExplorerLink } from '../../ExplorerLink';
/**
* 가능하면 `Locked` component는 `LockedObject`를 통해서만 사용한다.
*
* 이 component는 API에서 직접 가져온 데이터도 렌더링할 수 있지만,
* object는 전송 가능하므로 온체인 state에서 ownership도 검증하는 편을 선호하며,
* API는 모든 ownership 변화를 추적할 수 없다.
*/
export function Locked({
locked,
hideControls,
}: {
locked: ApiLockedObject;
hideControls?: boolean;
}) {
const account = useCurrentAccount();
const client = useCurrentClient();
const suiObject = useQuery({
queryKey: ['getObject', locked.itemId],
queryFn: async () => {
const { object } = await client.core.getObject({
objectId: locked.itemId,
});
return object;
},
});
const getLabel = () => {
if (locked.deleted) return 'Deleted';
if (hideControls) {
if (locked.creator === account?.address) return 'You offer this';
return "You'll receive this if accepted";
}
return undefined;
};
const getLabelClasses = () => {
if (locked.deleted) return 'bg-red-50 rounded px-3 py-1 text-sm text-red-500';
if (hideControls) {
if (!!locked.creator && locked.creator === account?.address)
return 'bg-blue-50 rounded px-3 py-1 text-sm text-blue-500';
return 'bg-green-50 rounded px-3 py-1 text-sm text-green-700';
}
return undefined;
};
return (
<SuiObjectDisplay object={suiObject.data!} label={getLabel()} labelClasses={getLabelClasses()}>
<div className="p-4 pt-1 text-right flex flex-wrap items-center justify-between">
{
<p className="text-sm flex-shrink-0 flex items-center gap-2">
<ExplorerLink id={locked.objectId} isAddress={false} />
</p>
}
</div>
</SuiObjectDisplay>
);
}
OwnedLockedList component를 포함하도록 src/routes/LockedDashboard.tsx를 업데이트한다:
LockedDashboard.tsx
LockedDashboard.tsximport { useState } from "react";
import { Tabs } from "@radix-ui/themes";
import { LockOwnedObjects } from "@/components/locked/LockOwnedObjects";
import { OwnedLockedList } from "@/components/locked/OwnedLockedList";
export function LockedDashboard() {
const tabs = [
{
name: "My Locked Objects",
component: () => <OwnedLockedList />,
},
{
name: "Lock Owned objects",
component: () => <LockOwnedObjects />,
},
];
const [tab, setTab] = useState(tabs[0].name);
return (
<Tabs.Root value={tab} onValueChange={setTab}>
<Tabs.List>
{tabs.map((tab, index) => {
return (
<Tabs.Trigger
key={index}
value={tab.name}
className="cursor-pointer"
>
{tab.name}
</Tabs.Trigger>
);
})}
</Tabs.List>
{tabs.map((tab, index) => {
return (
<Tabs.Content key={index} value={tab.name}>
{tab.component()}
</Tabs.Content>
);
})}
</Tabs.Root>
);
}
앱을 실행하고 다음이 가능한지 확인한다:
- 연결된 wallet account의 locked object를 볼 수 있다.
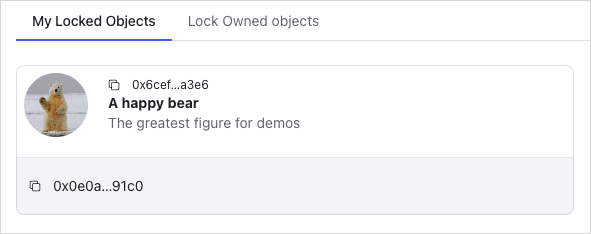
Unlocking owned objects
object를 unlock하려면 {PACKAGE_ID}::lock::unlock으로 식별되는 unlock Move 함수를 실행한다.
unlock 함수에 Locked object, 이에 대응하는 Key, 원래 object의 struct type을 제공하고, unlock된 object를 현재 연결된 wallet account로 전송한다.
또한 성공 시 1초 뒤 query key locked의 cache 데이터를 invalidate하여 react-query가 해당 query key에 대한 데이터를 자동으로 다시 가져오게 하는 onSuccess callback도 구현한다.
owned object를 unlock하는 일은 이 애플리케이션에서 또 다른 중요한 온체인 작업이며 복잡한 부분이다. discoverability와 캡슐화를 높이기 위해 이 로직�을 별도의 mutate 함수로 분리한다.
src/mutations/locked.ts
src/mutations/locked.tsimport { CONSTANTS, QueryKey } from "@/constants";
import { useTransactionExecution } from "@/hooks/useTransactionExecution";
import { useCurrentAccount, useSuiClient } from "@mysten/dapp-kit";
import { SuiObjectData } from "@mysten/sui/client";
import { Transaction } from "@mysten/sui/transactions";
import { useMutation, useQueryClient } from "@tanstack/react-query";
import toast from "react-hot-toast";
/**
* Builds and executes the PTB to lock an object.
*/
export function useLockObjectMutation() {
const account = useCurrentAccount();
const executeTransaction = useTransactionExecution();
return useMutation({
mutationFn: async ({ object }: { object: SuiObjectData }) => {
if (!account?.address)
throw new Error("You need to connect your wallet!");
const txb = new Transaction();
const [locked, key] = txb.moveCall({
target: `${CONSTANTS.escrowContract.packageId}::lock::lock`,
arguments: [txb.object(object.objectId)],
typeArguments: [object.type!],
});
txb.transferObjects([locked, key], txb.pure.address(account.address));
return executeTransaction(txb);
},
});
}
/**
* Builds and executes the PTB to unlock an object.
*/
export function useUnlockMutation() {
const account = useCurrentAccount();
const executeTransaction = useTransactionExecution();
const client = useSuiClient();
const queryClient = useQueryClient();
return useMutation({
mutationFn: async ({
lockedId,
keyId,
suiObject,
}: {
lockedId: string;
keyId: string;
suiObject: SuiObjectData;
}) => {
if (!account?.address)
throw new Error("You need to connect your wallet!");
const key = await client.getObject({
id: keyId,
options: {
showOwner: true,
},
});
if (
!key.data?.owner ||
typeof key.data.owner === "string" ||
!("AddressOwner" in key.data.owner) ||
key.data.owner.AddressOwner !== account.address
) {
toast.error("You are not the owner of the key");
return;
}
const txb = new Transaction();
const item = txb.moveCall({
target: `${CONSTANTS.escrowContract.packageId}::lock::unlock`,
typeArguments: [suiObject.type!],
arguments: [txb.object(lockedId), txb.object(keyId)],
});
txb.transferObjects([item], txb.pure.address(account.address));
return executeTransaction(txb);
},
onSuccess: () => {
setTimeout(() => {
// invalidating the queries after a small latency
// because the indexer works in intervals of 1s.
// if we invalidate too early, we might not get the latest state.
queryClient.invalidateQueries({
queryKey: [QueryKey.Locked],
});
}, 1_000);
},
});
}
useUnlockObjectMutation hook을 포함하도록 src/components/locked/partials/Locked.tsx를 업데이트한다:
Locked.tsx
Locked.tsximport { useCurrentAccount, useCurrentClient } from '@mysten/dapp-kit-react';
import { ArrowDownIcon, ArrowUpIcon, LockOpen1Icon } from '@radix-ui/react-icons';
import { Button } from '@radix-ui/themes';
import { useQuery } from '@tanstack/react-query';
import { useState } from 'react';
import { SuiObjectDisplay } from '@/components/SuiObjectDisplay';
import { useUnlockMutation } from '@/mutations/locked';
import { ApiLockedObject } from '@/types/types';
import { ExplorerLink } from '../../ExplorerLink';
/**
* 가능하면 `Locked` component는 `LockedObject`를 통해서만 사용한다.
*
* 이 component는 API에서 직접 가져온 데이터도 렌더링할 수 있지만,
* object는 전송 가능하므로 온체인 state에서 ownership도 검증하는 편을 선호하며,
* API는 모든 ownership 변화를 추적할 수 없다.
*/
export function Locked({
locked,
hideControls,
}: {
locked: ApiLockedObject;
hideControls?: boolean;
}) {
const [isToggled, setIsToggled] = useState(false);
const account = useCurrentAccount();
const client = useCurrentClient();
const { mutate: unlockMutation, isPending } = useUnlockMutation();
const suiObject = useQuery({
queryKey: ['getObject', locked.itemId],
queryFn: async () => {
const { object } = await client.core.getObject({
objectId: locked.itemId,
});
return object;
},
});
const isOwner = () => {
return !!locked.creator && account?.address === locked.creator;
};
const getLabel = () => {
if (locked.deleted) return 'Deleted';
if (hideControls) {
if (locked.creator === account?.address) return 'You offer this';
return "You'll receive this if accepted";
}
return undefined;
};
const getLabelClasses = () => {
if (locked.deleted) return 'bg-red-50 rounded px-3 py-1 text-sm text-red-500';
if (hideControls) {
if (!!locked.creator && locked.creator === account?.address)
return 'bg-blue-50 rounded px-3 py-1 text-sm text-blue-500';
return 'bg-green-50 rounded px-3 py-1 text-sm text-green-700';
}
return undefined;
};
return (
<SuiObjectDisplay object={suiObject.data!} label={getLabel()} labelClasses={getLabelClasses()}>
<div className="p-4 pt-1 text-right flex flex-wrap items-center justify-between">
{
<p className="text-sm flex-shrink-0 flex items-center gap-2">
<ExplorerLink id={locked.objectId} isAddress={false} />
</p>
}
{!hideControls && isOwner() && (
<Button
className="ml-auto cursor-pointer"
disabled={isPending}
onClick={() => {
unlockMutation({
lockedId: locked.objectId,
keyId: locked.keyId,
suiObject: suiObject.data!,
});
}}
>
<LockOpen1Icon /> Unlock
</Button>
)}
</div>
</SuiObjectDisplay>
);
}
앱을 실행하고 다음이 가능한지 확인한다:
- locked object를 unlock할 수 있다.
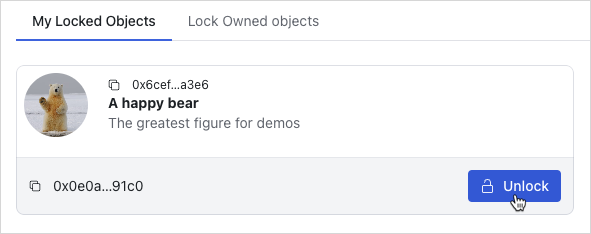
Display locked objects to escrow
LockedList component를 포함하도록 src/routes/EscrowDashboard.tsx를 업데이트한다:
EscrowDashboard.tsx
EscrowDashboard.tsximport { InfoCircledIcon } from '@radix-ui/react-icons';
import { Tabs, Tooltip } from '@radix-ui/themes';
import { useState } from 'react';
import { LockedList } from '../components/locked/ApiLockedList';
export function EscrowDashboard() {
const tabs = [
{
name: 'Browse Locked Objects',
component: () => (
<LockedList
params={{
deleted: 'false',
}}
enableSearch
/>
),
tooltip: 'Browse locked objects you can trade for.',
},
];
const [tab, setTab] = useState(tabs[0].name);
return (
<Tabs.Root value={tab} onValueChange={setTab}>
<Tabs.List>
{tabs.map((tab, index) => {
return (
<Tabs.Trigger key={index} value={tab.name} className="cursor-pointer">
{tab.name}
<Tooltip content={tab.tooltip}>
<InfoCircledIcon className="ml-3" />
</Tooltip>
</Tabs.Trigger>
);
})}
</Tabs.List>
{tabs.map((tab, index) => {
return (
<Tabs.Content key={index} value={tab.name}>
{tab.component()}
</Tabs.Content>
);
})}
</Tabs.Root>
);
}
src/components/locked/ApiLockedList.tsx를 추가한다:
ApiLockedList.tsx
ApiLockedList.tsximport { useInfiniteQuery } from "@tanstack/react-query";
import { CONSTANTS, QueryKey } from "@/constants";
import { InfiniteScrollArea } from "@/components/InfiniteScrollArea";
import { ApiLockedObject, LockedListingQuery } from "@/types/types";
import { constructUrlSearchParams, getNextPageParam } from "@/utils/helpers";
import { useSuiClient } from "@mysten/dapp-kit";
import { TextField } from "@radix-ui/themes";
import { useState } from "react";
import { LockedObject } from "./LockedObject";
import { useGetLockedObject } from "@/hooks/useGetLockedObject";
/**
* Fetches all the non-deleted system `Locked` objects from the API in a paginated fashion.
* Then, it proceeds into fetching the on-chain state, so we can better trust the latest
* state of the object in regards to ownership.
*
* We do this because `Locked` object has `store` ability, so that means that the `creator` field
* from the API could be stale.
*/
export function LockedList({
enableSearch,
params,
}: {
isPersonal?: boolean;
enableSearch?: boolean;
params: LockedListingQuery;
}) {
const [lockedId, setLockedId] = useState("");
const suiClient = useSuiClient();
const { data: searchData } = useGetLockedObject({
lockedId,
});
const { data, fetchNextPage, hasNextPage, isLoading, isFetchingNextPage } =
useInfiniteQuery({
initialPageParam: null,
queryKey: [QueryKey.Locked, params, lockedId],
queryFn: async ({ pageParam }) => {
/*
* Fetch the locked objects from the API.
*/
const data = await (
await fetch(
CONSTANTS.apiEndpoint +
"locked" +
constructUrlSearchParams({
deleted: "false",
...(pageParam ? { cursor: pageParam as string } : {}),
...(params || {}),
}),
)
).json();
/*
* Use the objectIds from the API to fetch the on-chain state. This is done to ensure that
* the ownership of each object is up-to-date.
*/
const objects = await suiClient.multiGetObjects({
ids: data.data.map((x: ApiLockedObject) => x.objectId),
options: {
showOwner: true,
showContent: true,
},
});
return {
suiObjects: objects.map((x) => x.data),
api: data,
};
},
select: (data) => data.pages,
getNextPageParam,
enabled: !lockedId,
});
/**
* Returns all `Locked` objects or the one that matches the search query if it exists.
*/
const suiObjects = () => {
if (lockedId) {
if (
!searchData?.data?.type?.startsWith(CONSTANTS.escrowContract.lockedType)
)
return [];
return [searchData?.data!];
}
return data?.flatMap((x) => x.suiObjects) || [];
};
const apiData = () => {
return data?.flatMap((x) => x.api.data);
};
// Find the itemID from the API request to skip fetching the DF on-chain.
// We can always be certain that the itemID can't change for a given `Locked` object.
const getItemId = (objectId?: string) => {
return apiData()?.find((x) => x.objectId === objectId)?.itemId;
};
return (
<>
{enableSearch && (
<TextField.Root
className="mt-3"
placeholder="Search by locked id"
value={lockedId}
onChange={(e) => setLockedId(e.target.value)}
></TextField.Root>
)}
<InfiniteScrollArea
loadMore={() => fetchNextPage()}
hasNextPage={hasNextPage}
loading={isFetchingNextPage || isLoading}
>
{suiObjects().map((object) => (
<LockedObject
key={object?.objectId!}
object={object!}
itemId={getItemId(object?.objectId)}
/>
))}
</InfiniteScrollArea>
</>
);
}
이 hook은 삭제되지 않은 시스템 Locked object를 paginated 방식으로 API에서 모두 가져온다.
그 다음 최신 상태가 표시되도록 온체인 state를 추가로 가져온다.
src/hooks/useGetLockedObject.ts를 추가한다
src/hooks/useGetLockedObject.ts를 추가한다import { useSuiClientQuery } from "@mysten/dapp-kit";
/**
* A re-usable hook for querying a locked object by ID
* from the on-chain state.
*/
export function useGetLockedObject({ lockedId }: { lockedId: string }) {
return useSuiClientQuery(
"getObject",
{
id: lockedId,
options: {
showType: true,
showOwner: true,
showContent: true,
},
},
{
enabled: !!lockedId,
},
);
}
앱을 실행하고 다음이 가능한지 확인한다:
Escrows페이지의Browse Locked Objectstab에서 locked object를 볼 수 있다.
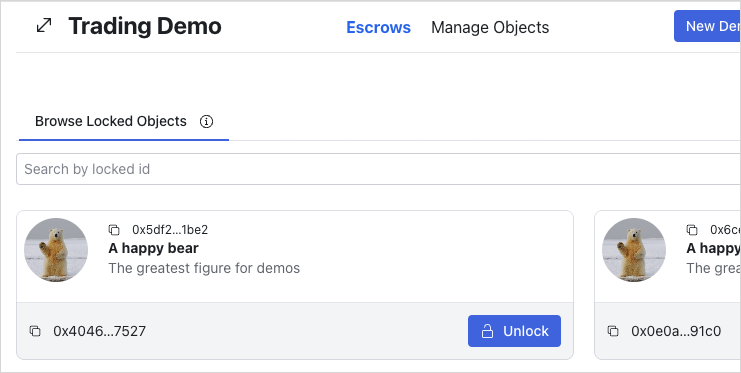
Create escrows
escrow를 생성하려면 src/mutations/escrow.ts의 useCreateEscrowMutation hook을 통해 mutate 함수를 포함한다.
이 hook은 거래할 escrow 대상 item과 다른 party의 ApiLockedObject를 parameter로 받는다.
그런 다음 {PACKAGE_ID}::shared::create Move 함수를 호출하고 escrow할 item, 교환할 locked object의 key ID, 그리고 escrow의 recipient(locked object의 owner)을 제공한다.
escrow.ts
escrow.tsimport { useCurrentAccount } from '@mysten/dapp-kit-react';
import { SuiObjectData } from '@mysten/sui/jsonRpc';
import { Transaction } from '@mysten/sui/transactions';
import { useMutation } from '@tanstack/react-query';
import { CONSTANTS } from '@/constants';
import { useTransactionExecution } from '@/hooks/useTransactionExecution';
import { ApiLockedObject } from '@/types/types';
/**
* escrow를 생성하기 위한 PTB를 빌드하고 실행한다.
*/
export function useCreateEscrowMutation() {
const currentAccount = useCurrentAccount();
const executeTransaction = useTransactionExecution();
return useMutation({
mutationFn: async ({ object, locked }: { object: SuiObjectData; locked: ApiLockedObject }) => {
if (!currentAccount?.address) throw new Error('You need to connect your wallet!');
const txb = new Transaction();
txb.moveCall({
target: `${CONSTANTS.escrowContract.packageId}::shared::create`,
arguments: [
txb.object(object.objectId!),
txb.pure.id(locked.keyId),
txb.pure.address(locked.creator!),
],
typeArguments: [object.type!],
});
return executeTransaction(txb);
},
});
}
useCreateEscrowMutation hook을 포함하도록 src/components/locked/partials/Locked.tsx를 업데이트한다
useCreateEscrowMutation hook을 포함하도록 src/components/locked/partials/Locked.tsx를 업데이트한다import { useCurrentAccount, useSuiClientQuery } from "@mysten/dapp-kit";
import { SuiObjectDisplay } from "@/components/SuiObjectDisplay";
import { Button } from "@radix-ui/themes";
import {
ArrowDownIcon,
ArrowUpIcon,
LockOpen1Icon,
} from "@radix-ui/react-icons";
import { ExplorerLink } from "../../ExplorerLink";
import { useState } from "react";
import { ApiLockedObject } from "@/types/types";
import { CreateEscrow } from "../../escrows/CreateEscrow";
import { useUnlockMutation } from "@/mutations/locked";
/**
* Prefer to use the `Locked` component only through `LockedObject`.
*
* This can also render data directly from the API, but we prefer
* to also validate ownership from on-chain state (as objects are transferrable)
* and the API cannot track all the ownership changes.
*/
export function Locked({
locked,
hideControls,
}: {
locked: ApiLockedObject;
hideControls?: boolean;
}) {
const [isToggled, setIsToggled] = useState(false);
const account = useCurrentAccount();
const { mutate: unlockMutation, isPending } = useUnlockMutation();
const suiObject = useSuiClientQuery(
"getObject",
{
id: locked.itemId,
options: {
showDisplay: true,
showType: true,
showOwner: true,
},
},
{
select: (data) => data.data,
},
);
const isOwner = () => {
return !!locked.creator && account?.address === locked.creator;
};
const getLabel = () => {
if (locked.deleted) return "Deleted";
if (hideControls) {
if (locked.creator === account?.address) return "You offer this";
return "You'll receive this if accepted";
}
return undefined;
};
const getLabelClasses = () => {
if (locked.deleted)
return "bg-red-50 rounded px-3 py-1 text-sm text-red-500";
if (hideControls) {
if (!!locked.creator && locked.creator === account?.address)
return "bg-blue-50 rounded px-3 py-1 text-sm text-blue-500";
return "bg-green-50 rounded px-3 py-1 text-sm text-green-700";
}
return undefined;
};
return (
<SuiObjectDisplay
object={suiObject.data!}
label={getLabel()}
labelClasses={getLabelClasses()}
>
<div className="p-4 pt-1 text-right flex flex-wrap items-center justify-between">
{
<p className="text-sm flex-shrink-0 flex items-center gap-2">
<ExplorerLink id={locked.objectId} isAddress={false} />
</p>
}
{!hideControls && isOwner() && (
<Button
className="ml-auto cursor-pointer"
disabled={isPending}
onClick={() => {
unlockMutation({
lockedId: locked.objectId,
keyId: locked.keyId,
suiObject: suiObject.data!,
});
}}
>
<LockOpen1Icon /> Unlock
</Button>
)}
{!hideControls && !isOwner() && (
<Button
className="ml-auto cursor-pointer bg-transparent text-black disabled:opacity-40"
disabled={!account?.address}
onClick={() => setIsToggled(!isToggled)}
>
Start Escrow
{isToggled ? <ArrowUpIcon /> : <ArrowDownIcon />}
</Button>
)}
{isToggled && (
<div className="min-w-[340px] w-full justify-self-start text-left">
<CreateEscrow locked={locked} />
</div>
)}
</div>
</SuiObjectDisplay>
);
}
src/components/escrows/CreateEscrow.tsx를 추가한다
src/components/escrows/CreateEscrow.tsx를 추가한다import { ApiLockedObject } from "@/types/types";
import { useCurrentAccount, useSuiClientInfiniteQuery } from "@mysten/dapp-kit";
import { formatAddress } from "@mysten/sui/utils";
import { Avatar, Button, Select } from "@radix-ui/themes";
import { InfiniteScrollArea } from "@/components/InfiniteScrollArea";
import { useState } from "react";
import { ExplorerLink } from "../ExplorerLink";
import { useCreateEscrowMutation } from "@/mutations/escrow";
/**
* A component that allows the user to create an escrow for a locked object.
* It fetches all the objects owned by the connected wallet address and allows the user to
* select one to put on escrow.
*/
export function CreateEscrow({ locked }: { locked: ApiLockedObject }) {
const [objectId, setObjectId] = useState<string | undefined>(undefined);
const account = useCurrentAccount();
const { mutate: createEscrowMutation, isPending } = useCreateEscrowMutation();
const { data, fetchNextPage, isFetchingNextPage, hasNextPage, refetch } =
useSuiClientInfiniteQuery(
"getOwnedObjects",
{
owner: account?.address!,
options: {
showDisplay: true,
showType: true,
},
},
{
enabled: !!account,
select: (data) =>
data.pages
.flatMap((page) => page.data)
.filter(
// we're filtering out objects that don't have Display or image_url
// for demo purposes. The Escrow contract works with all objects.
(x) => !!x.data?.display && !!x.data?.display?.data?.image_url,
),
},
);
const getObject = () => {
const object = data?.find((x) => x.data?.objectId === objectId);
if (!object || !object.data) {
return;
}
return object.data;
};
return (
<div className="px-3 py-3 grid grid-cols-1 gap-5 mt-3 rounded">
<div>
<label className="text-xs">The recipient will be:</label>
<ExplorerLink id={locked.creator!} isAddress />
</div>
<div>
<label className="text-xs">Select which object to put on escrow:</label>
<Select.Root value={objectId} onValueChange={setObjectId}>
<Select.Trigger
className="h-auto min-h-[25px] w-full mt-3 py-2"
placeholder="Pick an object"
/>
<Select.Content className="max-w-[550px] overflow-hidden">
<Select.Group>
<Select.Label>Select an Object</Select.Label>
<InfiniteScrollArea
loadMore={() => fetchNextPage()}
hasNextPage={hasNextPage}
loading={isFetchingNextPage}
gridClasses="grid-cols-1 gap-2"
>
{data?.map((object) => {
return (
<Select.Item
key={object.data?.objectId!}
value={object.data?.objectId!}
className="h-auto w-full data-[state=checked]:bg-blue-50 whitespace-pre-wrap overflow-hidden break-words hover:bg-blue-50 bg-white text-black cursor-pointer"
>
<div className="flex items-center break-words">
<Avatar
size="2"
radius="medium"
fallback="*"
className="mr-3"
src={object.data?.display?.data?.image_url!}
/>
<div className="text-xs overflow-ellipsis">
{(object.data?.display?.data?.name || "-").substring(
0,
100,
)}
<p className="text-gray-600">
{formatAddress(object.data?.objectId!)}
</p>
</div>
</div>
</Select.Item>
);
})}
</InfiniteScrollArea>
</Select.Group>
</Select.Content>
</Select.Root>
</div>
{objectId && (
<div>
<label className="text-xs">You'll be offering:</label>
<ExplorerLink id={objectId} />
</div>
)}
<div className="text-right">
<Button
className="cursor-pointer"
disabled={isPending || !objectId}
onClick={() => {
createEscrowMutation(
{ locked, object: getObject()! },
{
onSuccess: () => {
refetch();
setObjectId(undefined);
},
},
);
}}
>
Create Escrow
</Button>
</div>
</div>
);
}
앱을 실행하고 다음이 가능한지 확인한다:
- escrow를 생성할 수 있다.
object는 Escrows 페이지의 Browse Locked Objects tab에 있는 locked object 목록에서 사라져야 한다.
나중 단계에서 escrows를 보고 수락하거나 취소할 수 있다.
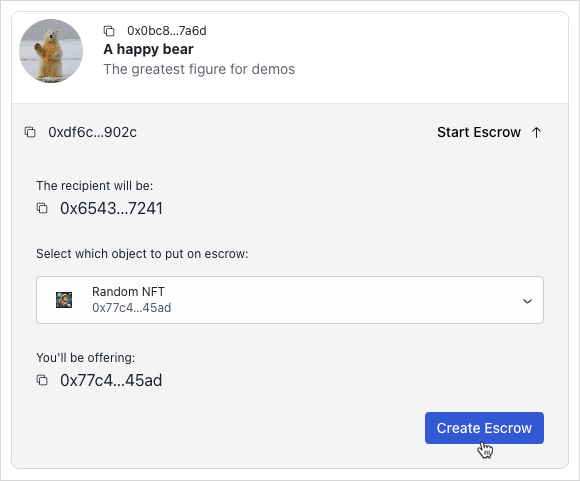
Cancel escrows
escrow를 취소하려면 src/mutations/escrow.ts의 useCancelEscrowMutation hook을 통해 mutation을 만든다.
cancel 함수는 escrow ApiEscrowObject와 그 온체인 데이터를 받는다.
{PACKAGE_ID}::shared::return_to_sender Move 호출은 generic이므로 escrow된 object의 type parameter를 요구한다.
그 다음 {PACKAGE_ID}::shared::return_to_sender를 실행하고, 반환된 escrow 대상 object를 escrow 생성자에게 전송한다.
escrow.ts
escrow.tsimport { useCurrentAccount } from '@mysten/dapp-kit-react';
import { SuiObjectData } from '@mysten/sui/jsonRpc';
import { Transaction } from '@mysten/sui/transactions';
import { useMutation, useQueryClient } from '@tanstack/react-query';
import { CONSTANTS, QueryKey } from '@/constants';
import { useTransactionExecution } from '@/hooks/useTransactionExecution';
import { ApiEscrowObject, ApiLockedObject } from '@/types/types';
/**
* escrow를 생성하기 위한 PTB를 빌드하고 실행한다.
*/
export function useCreateEscrowMutation() {
const currentAccount = useCurrentAccount();
const executeTransaction = useTransactionExecution();
return useMutation({
mutationFn: async ({ object, locked }: { object: SuiObjectData; locked: ApiLockedObject }) => {
if (!currentAccount?.address) throw new Error('You need to connect your wallet!');
const txb = new Transaction();
txb.moveCall({
target: `${CONSTANTS.escrowContract.packageId}::shared::create`,
arguments: [
txb.object(object.objectId!),
txb.pure.id(locked.keyId),
txb.pure.address(locked.creator!),
],
typeArguments: [object.type!],
});
return executeTransaction(txb);
},
});
}
/**
* escrow를 취소하기 위한 PTB를 빌드하고 실행한다.
*/
export function useCancelEscrowMutation() {
const currentAccount = useCurrentAccount();
const executeTransaction = useTransactionExecution();
const queryClient = useQueryClient();
return useMutation({
mutationFn: async ({
escrow,
suiObject,
}: {
escrow: ApiEscrowObject;
suiObject: SuiObjectData;
}) => {
if (!currentAccount?.address) throw new Error('You need to connect your wallet!');
const txb = new Transaction();
const item = txb.moveCall({
target: `${CONSTANTS.escrowContract.packageId}::shared::return_to_sender`,
arguments: [txb.object(escrow.objectId)],
typeArguments: [suiObject?.type!],
});
txb.transferObjects([item], txb.pure.address(currentAccount?.address!));
return executeTransaction(txb);
},
onSuccess: () => {
setTimeout(() => {
queryClient.invalidateQueries({ queryKey: [QueryKey.Escrow] });
}, 1_000);
},
});
}
src/components/escrows/Escrow.tsx를 추가한다
src/components/escrows/Escrow.tsx를 추가한다import { useCurrentAccount, useCurrentClient } from '@mysten/dapp-kit-react';
import { ArrowDownIcon, ArrowUpIcon, Cross1Icon } from '@radix-ui/react-icons';
import { Button } from '@radix-ui/themes';
import { useQuery } from '@tanstack/react-query';
import { useState } from 'react';
import { SuiObjectDisplay } from '@/components/SuiObjectDisplay';
import { CONSTANTS, QueryKey } from '@/constants';
import { useGetLockedObject } from '@/hooks/useGetLockedObject';
import { useCancelEscrowMutation } from '@/mutations/escrow';
import { ApiEscrowObject } from '@/types/types';
import { ExplorerLink } from '../ExplorerLink';
import { LockedObject } from '../locked/LockedObject';
/**
* escrow를 표시하고 사용자가 이를 수락하거나 취소할 수 있게 하는 component이다.
* API가 반환한 `escrow` object를 받는다.
*/
export function Escrow({ escrow }: { escrow: ApiEscrowObject }) {
const account = useCurrentAccount();
const client = useCurrentClient();
const [isToggled, setIsToggled] = useState(true);
const { mutate: cancelEscrowMutation, isPending: pendingCancellation } =
useCancelEscrowMutation();
const suiObject = useQuery({
queryKey: ['getObject', escrow?.itemId],
queryFn: async () => {
const { object } = await client.core.getObject({
objectId: escrow?.itemId,
});
return object;
},
});
const lockedData = useQuery({
queryKey: [QueryKey.Locked, escrow.keyId],
queryFn: async () => {
const res = await fetch(`${CONSTANTS.apiEndpoint}locked?keyId=${escrow.keyId}`);
return res.json();
},
select: (data) => data.data[0],
enabled: !escrow.cancelled,
});
const { data: suiLockedObject } = useGetLockedObject({
lockedId: lockedData.data?.objectId,
});
const getLabel = () => {
if (escrow.cancelled) return 'Cancelled';
if (escrow.swapped) return 'Swapped';
if (escrow.sender === account?.address) return 'You offer this';
if (escrow.recipient === account?.address) return "You'll receive this";
return undefined;
};
const getLabelClasses = () => {
if (escrow.cancelled) return 'text-red-500';
if (escrow.swapped) return 'text-green-500';
if (escrow.sender === account?.address)
return 'bg-blue-50 rounded px-3 py-1 text-sm text-blue-500';
if (escrow.recipient === account?.address)
return 'bg-green-50 rounded px-3 py-1 text-sm text-green-700';
return undefined;
};
return (
<SuiObjectDisplay object={suiObject.data!} label={getLabel()} labelClasses={getLabelClasses()}>
<div className="p-4 flex gap-3 flex-wrap">
{
<p className="text-sm flex-shrink-0 flex items-center gap-2">
<ExplorerLink id={escrow.objectId} isAddress={false} />
</p>
}
<Button
className="ml-auto cursor-pointer bg-transparent text-black"
onClick={() => setIsToggled(!isToggled)}
>
Details
{isToggled ? <ArrowUpIcon /> : <ArrowDownIcon />}
</Button>
{!escrow.cancelled && !escrow.swapped && escrow.sender === account?.address && (
<Button
color="amber"
className="cursor-pointer"
disabled={pendingCancellation}
onClick={() =>
cancelEscrowMutation({
escrow,
suiObject: suiObject.data!,
})
}
>
<Cross1Icon />
Cancel request
</Button>
)}
{isToggled && lockedData.data && (
<div className="min-w-[340px] w-full justify-self-start text-left">
{suiLockedObject?.data && (
<LockedObject
object={suiLockedObject.data}
itemId={lockedData.data.itemId}
hideControls
/>
)}
{!lockedData.data.deleted && escrow.recipient === account?.address && (
<div className="text-right mt-5">
<p className="text-xs pb-3">
When accepting the exchange, the escrowed item is transferred to you and your
locked item is transferred to the sender.
</p>
</div>
)}
{lockedData.data.deleted &&
!escrow.swapped &&
escrow.recipient === account?.address && (
<div>
<p className="text-red-500 text-sm py-2 flex items-center gap-3">
<Cross1Icon />
The locked object has been deleted so you cannot accept this anymore.
</p>
</div>
)}
</div>
)}
</div>
</SuiObjectDisplay>
);
}
src/components/escrows/EscrowList.tsx를 추가한다
src/components/escrows/EscrowList.tsx를 추가한다import { useInfiniteQuery } from "@tanstack/react-query";
import { CONSTANTS, QueryKey } from "@/constants";
import { Escrow } from "./Escrow";
import { InfiniteScrollArea } from "@/components/InfiniteScrollArea";
import { constructUrlSearchParams, getNextPageParam } from "@/utils/helpers";
import { ApiEscrowObject, EscrowListingQuery } from "@/types/types";
import { useState } from "react";
import { TextField } from "@radix-ui/themes";
/**
* A component that fetches and displays a list of escrows.
* It works by using the API to fetch them, and can be re-used with different
* API params, as well as an optional search by escrow ID functionality.
*/
export function EscrowList({
params,
enableSearch,
}: {
params: EscrowListingQuery;
enableSearch?: boolean;
}) {
const [escrowId, setEscrowId] = useState("");
const { data, fetchNextPage, hasNextPage, isLoading, isFetchingNextPage } =
useInfiniteQuery({
initialPageParam: null,
queryKey: [QueryKey.Escrow, params, escrowId],
queryFn: async ({ pageParam }) => {
const data = await fetch(
CONSTANTS.apiEndpoint +
"escrows" +
constructUrlSearchParams({
...params,
...(pageParam ? { cursor: pageParam as string } : {}),
...(escrowId ? { objectId: escrowId } : {}),
}),
);
return data.json();
},
select: (data) => data.pages.flatMap((page) => page.data),
getNextPageParam,
});
return (
<div>
{enableSearch && (
<TextField.Root
placeholder="Search by escrow id"
value={escrowId}
onChange={(e) => setEscrowId(e.target.value)}
/>
)}
<InfiniteScrollArea
loadMore={() => fetchNextPage()}
hasNextPage={hasNextPage}
loading={isFetchingNextPage || isLoading}
>
{data?.map((escrow: ApiEscrowObject) => (
<Escrow key={escrow.itemId} escrow={escrow} />
))}
</InfiniteScrollArea>
</div>
);
}
EscrowList component를 포함하도록 src/routes/EscrowDashboard.tsx를 업데이트한다
EscrowList component를 포함하도록 src/routes/EscrowDashboard.tsx를 업데이트한다import { useCurrentAccount } from '@mysten/dapp-kit-react';
import { InfoCircledIcon } from '@radix-ui/react-icons';
import { Tabs, Tooltip } from '@radix-ui/themes';
import { useState } from 'react';
import { EscrowList } from '../components/escrows/EscrowList';
import { LockedList } from '../components/locked/ApiLockedList';
export function EscrowDashboard() {
const account = useCurrentAccount();
const tabs = [
{
name: 'Browse Locked Objects',
component: () => (
<LockedList
params={{
deleted: 'false',
}}
enableSearch
/>
),
tooltip: 'Browse locked objects you can trade for.',
},
{
name: 'My Pending Requests',
component: () => (
<EscrowList
params={{
sender: account?.address,
swapped: 'false',
cancelled: 'false',
}}
enableSearch
/>
),
tooltip: 'Escrows you have initiated for third party locked objects.',
},
];
const [tab, setTab] = useState(tabs[0].name);
return (
<Tabs.Root value={tab} onValueChange={setTab}>
<Tabs.List>
{tabs.map((tab, index) => {
return (
<Tabs.Trigger key={index} value={tab.name} className="cursor-pointer">
{tab.name}
<Tooltip content={tab.tooltip}>
<InfoCircledIcon className="ml-3" />
</Tooltip>
</Tabs.Trigger>
);
})}
</Tabs.List>
{tabs.map((tab, index) => {
return (
<Tabs.Content key={index} value={tab.name}>
{tab.component()}
</Tabs.Content>
);
})}
</Tabs.Root>
);
}
앱을 실행하고 다음이 가능한지 확인한다:
Escrows페이지의My Pending Requeststab에서 escrows를 볼 수 있다.- 자신이 요청한 escrow를 취소할 수 있다.
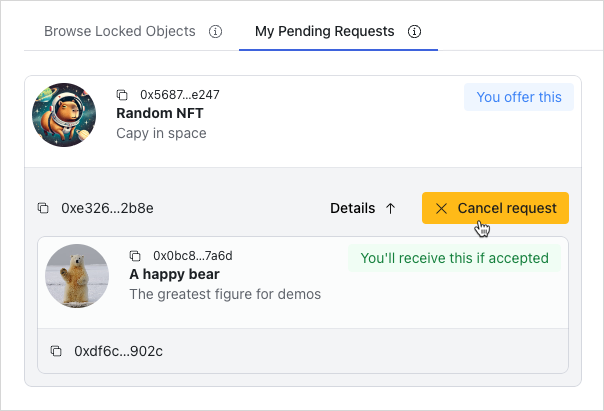
Accept escrows
escrow를 수락하려면 src/mutations/escrow.ts의 useAcceptEscrowMutation hook을 통해 mutation을 만든다.
이제 구현 방식이 꽤 익숙할 것이다.
accept 함수는 escrow ApiEscrowObject와 locked object ApiLockedObject를 받는다.
{PACKAGE_ID}::shared::swap Move 호출은 generic이므로 escrow된 object와 locked object의 type parameter를 요구한다.
Sui client instance에서 multiGetObjects를 사용해 object 세부 정보를 조회한다.
마지막으로 {PACKAGE_ID}::shared::swap Move 호출을 실행하고, 반환된 escrow 대상 item을 연결된 wallet account로 전송한다.
mutation이 성공하면 cache를 invalidate해 데이터가 자동으로 다시 fetch되도록 한다.
escrow.ts
escrow.tsimport { useCurrentAccount, useCurrentClient } from '@mysten/dapp-kit-react';
import { SuiObjectData } from '@mysten/sui/jsonRpc';
import { Transaction } from '@mysten/sui/transactions';
import { useMutation, useQueryClient } from '@tanstack/react-query';
import { CONSTANTS, QueryKey } from '@/constants';
import { useTransactionExecution } from '@/hooks/useTransactionExecution';
import { ApiEscrowObject, ApiLockedObject } from '@/types/types';
/**
* escrow를 생성하기 위한 PTB를 빌드하고 실행한다.
*/
export function useCreateEscrowMutation() {
const currentAccount = useCurrentAccount();
const executeTransaction = useTransactionExecution();
return useMutation({
mutationFn: async ({ object, locked }: { object: SuiObjectData; locked: ApiLockedObject }) => {
if (!currentAccount?.address) throw new Error('You need to connect your wallet!');
const txb = new Transaction();
txb.moveCall({
target: `${CONSTANTS.escrowContract.packageId}::shared::create`,
arguments: [
txb.object(object.objectId!),
txb.pure.id(locked.keyId),
txb.pure.address(locked.creator!),
],
typeArguments: [object.type!],
});
return executeTransaction(txb);
},
});
}
/**
* escrow를 취소하기 위한 PTB를 빌드하고 실행한다.
*/
export function useCancelEscrowMutation() {
const currentAccount = useCurrentAccount();
const executeTransaction = useTransactionExecution();
const queryClient = useQueryClient();
return useMutation({
mutationFn: async ({
escrow,
suiObject,
}: {
escrow: ApiEscrowObject;
suiObject: SuiObjectData;
}) => {
if (!currentAccount?.address) throw new Error('You need to connect your wallet!');
const txb = new Transaction();
const item = txb.moveCall({
target: `${CONSTANTS.escrowContract.packageId}::shared::return_to_sender`,
arguments: [txb.object(escrow.objectId)],
typeArguments: [suiObject?.type!],
});
txb.transferObjects([item], txb.pure.address(currentAccount?.address!));
return executeTransaction(txb);
},
onSuccess: () => {
setTimeout(() => {
queryClient.invalidateQueries({ queryKey: [QueryKey.Escrow] });
}, 1_000);
},
});
}
/**
* escrow를 수락하기 위한 PTB를 빌드하고 실행한다.
*/
export function useAcceptEscrowMutation() {
const currentAccount = useCurrentAccount();
const client = useCurrentClient();
const executeTransaction = useTransactionExecution();
const queryClient = useQueryClient();
return useMutation({
mutationFn: async ({
escrow,
locked,
}: {
escrow: ApiEscrowObject;
locked: ApiLockedObject;
}) => {
if (!currentAccount?.address) throw new Error('You need to connect your wallet!');
const txb = new Transaction();
const { objects } = await client.core.getObjects({
objectIds: [escrow.itemId, locked.itemId],
});
const escrowType = objects.find(
(x) => !(x instanceof Error) && x.objectId === escrow.itemId,
)?.type;
const lockedType = objects.find(
(x) => !(x instanceof Error) && x.objectId === locked.itemId,
)?.type;
if (!escrowType || !lockedType) {
throw new Error('Failed to fetch types.');
}
const item = txb.moveCall({
target: `${CONSTANTS.escrowContract.packageId}::shared::swap`,
arguments: [
txb.object(escrow.objectId),
txb.object(escrow.keyId),
txb.object(locked.objectId),
],
typeArguments: [escrowType, lockedType],
});
txb.transferObjects([item], txb.pure.address(currentAccount.address));
return executeTransaction(txb);
},
onSuccess: () => {
setTimeout(() => {
queryClient.invalidateQueries({ queryKey: [QueryKey.Escrow] });
}, 1_000);
},
});
}
useAcceptEscrowMutation hook을 포함하도록 src/components/escrows/Escrow.tsx를 업데이트한다
useAcceptEscrowMutation hook을 포함하도록 src/components/escrows/Escrow.tsx를 업데이트한다import { useCurrentAccount, useSuiClientQuery } from "@mysten/dapp-kit";
import { SuiObjectDisplay } from "@/components/SuiObjectDisplay";
import { Button } from "@radix-ui/themes";
import {
ArrowDownIcon,
ArrowUpIcon,
CheckCircledIcon,
Cross1Icon,
} from "@radix-ui/react-icons";
import { CONSTANTS, QueryKey } from "@/constants";
import { ExplorerLink } from "../ExplorerLink";
import { useQuery } from "@tanstack/react-query";
import { useState } from "react";
import { ApiEscrowObject } from "@/types/types";
import {
useAcceptEscrowMutation,
useCancelEscrowMutation,
} from "@/mutations/escrow";
import { useGetLockedObject } from "@/hooks/useGetLockedObject";
import { LockedObject } from "../locked/LockedObject";
/**
* A component that displays an escrow and allows the user to accept or cancel it.
* Accepts an `escrow` object as returned from the API.
*/
export function Escrow({ escrow }: { escrow: ApiEscrowObject }) {
const account = useCurrentAccount();
const [isToggled, setIsToggled] = useState(true);
const { mutate: acceptEscrowMutation, isPending } = useAcceptEscrowMutation();
const { mutate: cancelEscrowMutation, isPending: pendingCancellation } =
useCancelEscrowMutation();
const suiObject = useSuiClientQuery("getObject", {
id: escrow?.itemId,
options: {
showDisplay: true,
showType: true,
},
});
const lockedData = useQuery({
queryKey: [QueryKey.Locked, escrow.keyId],
queryFn: async () => {
const res = await fetch(
`${CONSTANTS.apiEndpoint}locked?keyId=${escrow.keyId}`,
);
return res.json();
},
select: (data) => data.data[0],
enabled: !escrow.cancelled,
});
const { data: suiLockedObject } = useGetLockedObject({
lockedId: lockedData.data?.objectId,
});
const getLabel = () => {
if (escrow.cancelled) return "Cancelled";
if (escrow.swapped) return "Swapped";
if (escrow.sender === account?.address) return "You offer this";
if (escrow.recipient === account?.address) return "You'll receive this";
return undefined;
};
const getLabelClasses = () => {
if (escrow.cancelled) return "text-red-500";
if (escrow.swapped) return "text-green-500";
if (escrow.sender === account?.address)
return "bg-blue-50 rounded px-3 py-1 text-sm text-blue-500";
if (escrow.recipient === account?.address)
return "bg-green-50 rounded px-3 py-1 text-sm text-green-700";
return undefined;
};
return (
<SuiObjectDisplay
object={suiObject.data?.data!}
label={getLabel()}
labelClasses={getLabelClasses()}
>
<div className="p-4 flex gap-3 flex-wrap">
{
<p className="text-sm flex-shrink-0 flex items-center gap-2">
<ExplorerLink id={escrow.objectId} isAddress={false} />
</p>
}
<Button
className="ml-auto cursor-pointer bg-transparent text-black"
onClick={() => setIsToggled(!isToggled)}
>
Details
{isToggled ? <ArrowUpIcon /> : <ArrowDownIcon />}
</Button>
{!escrow.cancelled &&
!escrow.swapped &&
escrow.sender === account?.address && (
<Button
color="amber"
className="cursor-pointer"
disabled={pendingCancellation}
onClick={() =>
cancelEscrowMutation({
escrow,
suiObject: suiObject.data?.data!,
})
}
>
<Cross1Icon />
Cancel request
</Button>
)}
{isToggled && lockedData.data && (
<div className="min-w-[340px] w-full justify-self-start text-left">
{suiLockedObject?.data && (
<LockedObject
object={suiLockedObject.data}
itemId={lockedData.data.itemId}
hideControls
/>
)}
{!lockedData.data.deleted &&
escrow.recipient === account?.address && (
<div className="text-right mt-5">
<p className="text-xs pb-3">
When accepting the exchange, the escrowed item will be
transferred to you and your locked item will be transferred
to the sender.
</p>
<Button
className="cursor-pointer"
disabled={isPending}
onClick={() =>
acceptEscrowMutation({
escrow,
locked: lockedData.data,
})
}
>
<CheckCircledIcon /> Accept exchange
</Button>
</div>
)}
{lockedData.data.deleted &&
!escrow.swapped &&
escrow.recipient === account?.address && (
<div>
<p className="text-red-500 text-sm py-2 flex items-center gap-3">
<Cross1Icon />
The locked object has been deleted so you can't accept this
anymore.
</p>
</div>
)}
</div>
)}
</div>
</SuiObjectDisplay>
);
}
EscrowList component를 포함하도록 src/routes/EscrowDashboard.tsx를 업데이트한다
EscrowList component를 포함하도록 src/routes/EscrowDashboard.tsx를 업데이트한다import { useState } from "react";
import { Tabs, Tooltip } from "@radix-ui/themes";
import { LockedList } from "../components/locked/ApiLockedList";
import { EscrowList } from "../components/escrows/EscrowList";
import { InfoCircledIcon } from "@radix-ui/react-icons";
import { useCurrentAccount } from "@mysten/dapp-kit";
export function EscrowDashboard() {
const account = useCurrentAccount();
const tabs = [
{
name: "Requested Escrows",
component: () => (
<EscrowList
params={{
recipient: account?.address,
swapped: "false",
cancelled: "false",
}}
/>
),
tooltip: "Escrows requested for your locked objects.",
},
{
name: "Browse Locked Objects",
component: () => (
<LockedList
params={{
deleted: "false",
}}
enableSearch
/>
),
tooltip: "Browse locked objects you can trade for.",
},
{
name: "My Pending Requests",
component: () => (
<EscrowList
params={{
sender: account?.address,
swapped: "false",
cancelled: "false",
}}
/>
),
tooltip: "Escrows you have initiated for third party locked objects.",
},
];
const [tab, setTab] = useState(tabs[0].name);
return (
<Tabs.Root value={tab} onValueChange={setTab}>
<Tabs.List>
{tabs.map((tab, index) => {
return (
<Tabs.Trigger
key={index}
value={tab.name}
className="cursor-pointer"
>
{tab.name}
<Tooltip content={tab.tooltip}>
<InfoCircledIcon className="ml-3" />
</Tooltip>
</Tabs.Trigger>
);
})}
</Tabs.List>
{tabs.map((tab, index) => {
return (
<Tabs.Content key={index} value={tab.name}>
{tab.component()}
</Tabs.Content>
);
})}
</Tabs.Root>
);
}
앱을 실행하고 다음이 가능한지 확인한다:
- 다른 사람이 요청한 escrow를 수락할 수 있다.
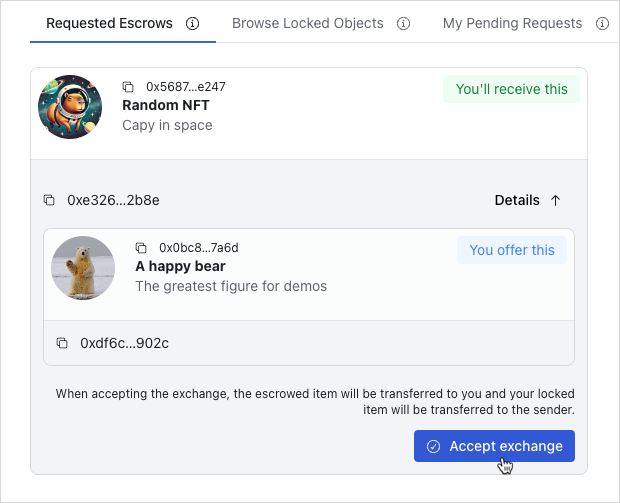
Finished frontend
이 시점에서 사용자가 거래를 발견하고 등록된 escrow와 상호작용할 수 있는 완전히 동작하는 frontend를 갖추게 된다. UI는 사용자가 쉽게 탐색하고 애플리케이션과 상호작용할 수 있도록 사용자 친화적이고 직관적으로 설계되었다. 앱을 직접 탐색하고 여러 기능을 시험해 본다.